Load into project
The Load into project operation loads data from repository tables into a process analysis project. Once the data is loaded, timelines will be created, a project overview page will be generated, and you will be able to use various analysis modules and features and functions available in ABBYY Timeline.
If you intend to use other operations to prepare your data before loading it into a project, be sure to make Load into project the last operation in your to-do list or numbered list of operations. The results obtained by running the operations placed after the Load into project operation will be displayed in the repository but will not be loaded into your project.
Note: If no Load into project operation is added to the to-do list or to the numbered list of operations, the data will continue to be stored in the repository.
Configuring the operation
- Select a project into which you need to load data. You can also create a new project if required. To do this, click Create new project, enter a name, and click Save. The new project will appear in the Select project list.
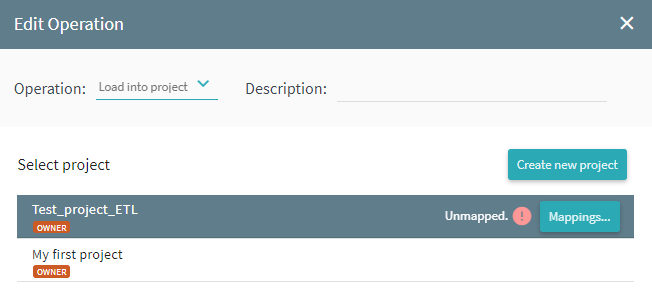
- If required, click Mappings to map certain data in your project.
Data mapping is a way to tell ABBYY Timeline which of the columns are completely new and which can be associated with existing columns.
Suppose there is a Name column in your new table and an EMPLOYEE column in your target project and both columns contain the first and last names of company employees. Then you can map the data in these two columns by dragging the EMPLOYEE title onto the Name column and clicking Select mapping.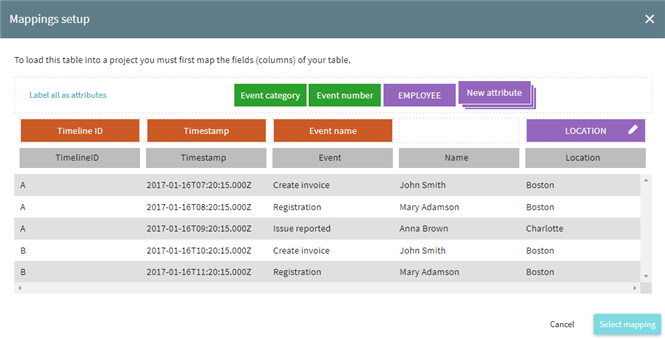
For more information about the data mapping procedure, see Process Analysis Project > Mapping Data. - Select the Have time zone option if the time stamps in your table contain this type of data. A time stamp may look as follows: 2011-02-03 04:05:06-07:00, where the last four digits indicate the time zone.
- Select the Clean up project option if you want to delete some or all of the timelines from the target project.
Important. Deleting timelines is irreversible. You will not be able to restore them in the project unless you re-upload the removed data. - Delete all timelines
Removes all currently existing timelines from the target project before loading new data. - Delete timelines older than
Removes timelines that fall behind the specified time range. Enter the time value manually and select the time unit from seconds to years. - Delete timelines where
Removes timelines containing events with certain attribute values. Click Set filters and select a certain event or all of them. Set the required Operator for Attribute values of interest, then manually provide the values.
Note. Only timelines containing events with these exact attribute values will be deleted, make sure to enter correct ones. - You can use a filter to load only data that meets certain criteria. For example, you can choose to load only data related to a particular department or employee.
For details, see Using Filters with Operations. - Click Save. The Edit Operation window will close and the new operation will appear in the Operations pane.
Important. Any operations added after the Load into project operation will only change the table stored in the repository. Running such operations will not affect the data in your project.

9/5/2024 4:23:54 PM