Task Definition
Before you analyze data within your Task Mining project, you need to define tasks. To do it, specify its start and end forms and additional settings. The program will use task definitions to mark up the log and identify task instances. Logs will be cut based on task definitions to create timelines for future analysis.
Note. Before defining tasks, it is recommended to check forms in Form editor. You may want to move screenshots and connected controls to another form or merge forms to improve task definition.
How to define a task
- Open Task editor by clicking Let's start (if you work with a new project) or Task definition (if you are using an existing project with logs uploaded earlier).
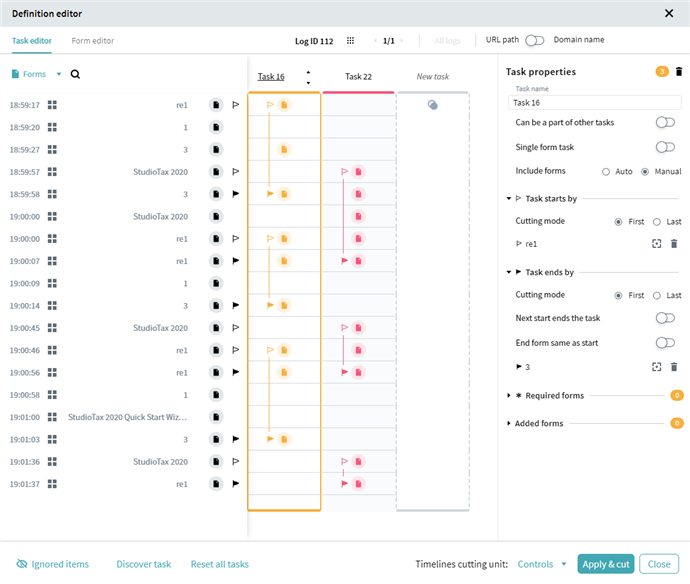
Task editor will display forms detected in a log. Use the arrows in the top pane to switch between logs. - Click on forms in the log. On the Form properties pane, you will be able to review associated screenshots. You can move user actions between forms in Form editor if necessary. See Review Forms for details.
- Drag and drop a form from the log to a New task column. This form will be the start one for the task.
- Drag and drop another form to the same task column that finishes the task. In the appeared window select Mark form as End for task.
Note. You can add multiple start and end forms for the same task. While dropping select Mark form as Start for task or Mark form as End for task correspondingly. - You can also apply additional settings to the task definition on the Task properties pane. For example, set cutting mode for start and end forms, add ignored elements, create a single form task, or specify required or removed forms. To open the Task properties pane, click on a task name in the Task editor window.
Note. You can resize the right pane in Task editor by dragging the gray boundary.
For details, see:
Task Properties
Cutting Mode
Ignored Elements - Select the method to create timelines from the task definition. In Timelines cutting unit, select:
- Forms - to create timelines where a form represents an event.
- Controls - to create timelines where a control represents an event.
- When finished, click Apply & cut. The program will search and extract all task instances in logs that correspond to the task definition. Each task instance will be treated as a timeline.
Note. You can cancel cutting process by clicking Abort. The latest changes won't be applied. After aborting, Task editor opens with the changes made before clicking Apply & cut.
How to select start and end forms
To select the start and end points of the task, begin with a recorded actions review. Determine what is the most common way to begin or finish a task. It is significant that all task instances should include this step so the program can consider them as a part of the same task.
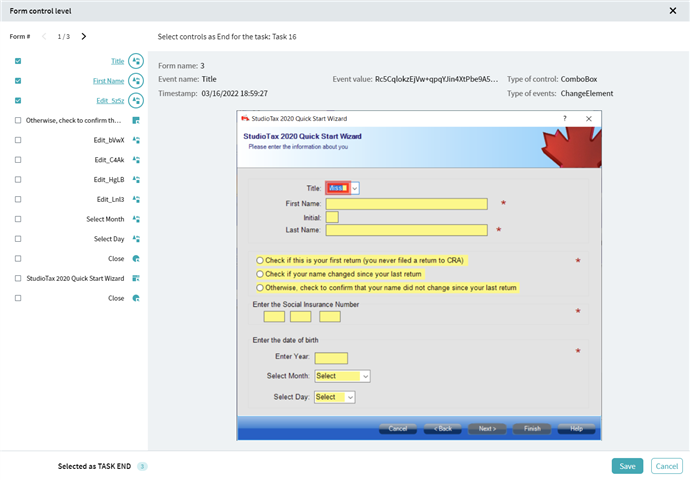
For example, a user sends parcels. They can start by filling up delivery documents, checking order details, or reviewing clients' information. The task can start not only with the whole form but with a certain action, i.e. control, that the user uses. Check logs in Form editor to see recorded forms and controls within them presented as screenshots. This helps to select the best option to start with. For end forms, follow the same workflow.
Use Task properties to make the task definition flexible and convenient. You can add multiple start and end points, finish a task with any form that goes before the next start point, add forms or remove unwanted forms from definitions using Manual mode. Check the variety of options here: Task Properties, Cutting Mode, Ignored Elements.
Examples for defining tasks
Start or end task with controls.
Defining concurrent and overlapping tasks using Auto and Manual modes.
Creating a single form task.
05.09.2024 16:23:54

