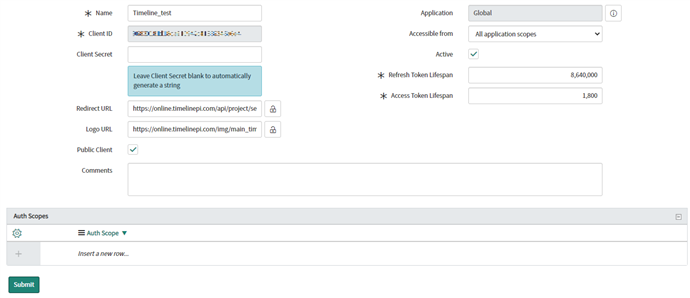
Register Timeline as a ServiceNow external client. During the registration, Client Id and Client Secret are generated in the Application Registry form. Keep these values, as you will need to specify them in Timeline while connecting to ServiceNow.
How to register cloud Timeline instance in ServiceNow.
- Log in to your ServiceNow account.
- Navigate to System OAuth > Application Registry.
To easily find this section, type "oauth" in the search box.
- Click New to add an application endpoint.
- Choose Create an OAuth API endpoint for external clients from the list.
- In the Name field, enter a name to identify the Timeline connection.
For example, MyTimeline or ABBYY-Timeline.
- Specify Redirect URL.
You need to set URL for the Timeline instance you have. Click the lock button next to this field and enter URL.
Copy the URL from the list below in which you have a Timeline account.
- Cloud Timeline instance for users in the United States
https://online.timelinepi.com/api/project/service-now/callback
- Cloud Timeline instance for users in Europe
https://eu.timelinepi.com/api/project/service-now/callback
- Cloud Timeline instance for users in Australia
https://au.timelinepi.com/api/project/service-now/callback
- Cloud Timeline instance for users in Japan
https://jp.timelinepi.com/api/project/service-now/callback
- Set Logo URL if needed.
You can use any logo you want. The logo appears on the authenticating ServiceNow page when Timeline requests to grant access to a resource.
To configure the Timeline logo, use the instance homepage with the /img/main_timeline_logo.png appendix. For example:
https://online.timelinepi.com/img/main_timeline_logo.png
- In the Accessible from field select All application scopes.
- If necessary, modify the values for Refresh Token Lifespan and Access Token Lifespan.
Otherwise, leave default values.
- Click Submit to save changes.
After clicking Submit the Client Secret value will be generated automatically. Click the lock button near Client Secret in ServiceNow to see its value.

How to register Timeline installed on-premises in ServiceNow.
Important. Make sure that your Timeline instance has access to the external network.
- Log in to your ServiceNow account.
- Navigate to System OAuth > Application Registry.
To easily find this section, type "oauth" in the search box.
- Click New to add an application endpoint.
- Choose Create an OAuth API endpoint for external clients from the list.
- In the Name field, enter a name to identify the Timeline connection.
For example, MyTimeline or ABBYY-Timeline.
- Specify Redirect URL.
You need to set URL for the Timeline instance you have. Click the lock button next to this field and enter URL. Use the Timeline base URL configured during installation with the /api/project/service-now/callback appendix.
For example, the Redirect URL value for the HTTPS base URL, if a custom port is specified:
https://mytimeline.com:30433/api/project/service-now/callback
For details on the Timeline base URL, see:
Deployment Guide on Windows Systems > Timeline Base URL and Ports Configuration
or
Deployment Guide on Linux Systems > Installing Timeline > Configure web server
- Set Logo URL if needed.
You can use any logo you want. The logo appears on the authenticating ServiceNow page when Timeline requests to grant access to a resource.
To configure the Timeline logo, use the base URL with the /img/main_timeline_logo.png appendix. For example:
https://mytimeline.com:30433/img/main_timeline_logo.png
- In the Accessible from field select All application scopes.
- If necessary, modify the values for Refresh Token Lifespan and Access Token Lifespan.
Otherwise, leave default values.
- Click Submit to save changes.
After clicking Submit the Client Secret value will be generated automatically. Click the lock button near Client Secret in ServiceNow to see its value.
