English (English)
How to Schedule Alert
Alert scheduling allows to systematize report receiving. Each time the alert is triggered by schedule, the program searches the latest generated report for it and resends this notification.
Configure Schedule
- Click Add Schedule in the Edit alert window.
- Make sure a schedule is Active.
Note. The program checks alert conditions and sends a report after the new data upload regardless of the schedule. - Specify Recurrence.
Choose the frequency of receiving notifications.
Note. You can change Time manually, for example, type 3:45 PM. Enter Time in UTC+00:00 time zone. - Interval
Set start Time for the first scheduled notification and time gaps between the next reports - every 1/2/3/6/12/24 hours. - Daily
Set Time for everyday notification. - Weekly
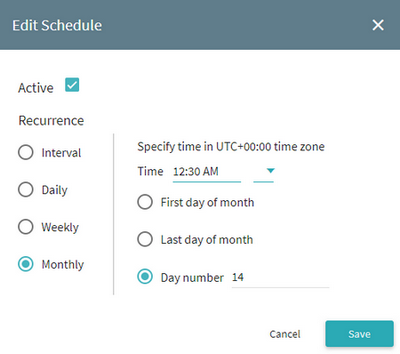
Set Time and select Days of week from the drop-down list when users will receive reports. - Monthly
Set Time and day of the month when the notifications are sent - First day of month, Last day of month or choose Day number and enter a date.
For example, it can be the 14th of every month at 12:30 AM UTC+00:00.
- Click Save.
The configured schedule is displayed in the Edit alert window, where its status (Active or Inactive) and Recurrence settings are shown. You can click  to edit or delete the schedule here.
05.09.2024 16:23:54