Configure Alert Using POST Method
Webhook is a mechanism that informs users, other applications, or IT systems when something happens in processes. After data upload, the application sends a corresponding notification if some timelines meet the set conditions.
One of the available methods for creating a webhook is POST. Timeline creates a new HTTP POST request and sends it to a specified URL address.
How to create Webhook
- Click
 to open the Edit alert window.
Important. You should add an alert and configure its settings before creating a webhook. For instructions, see How to Create and Execute Alert. - Click
 in the Webhooks section.
 - Select POST method.
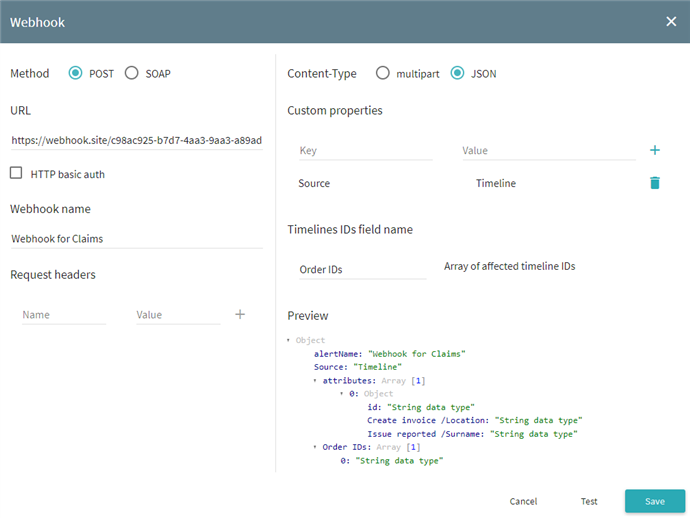
- Configure parameters for a webhook.
Some of them can be optional. Parameters are described in the table below.
| Parameter | Description |
|---|---|
| URL | A valid URL, where information is sent. |
| HTTP Basic Auth (optional) |
Valid credentials in case the webhook needs authentication. To set credentials:
|
| Webhook name | A webhook name you see in reports. It will help identify the alert. |
| Request Headers (optional) |
Additional HTTP headers and their values that a POST request will include. To add a header:
|
| Content-Type: Multipart | Timelines IDs field name An array name that contains matched timeline IDs. For example, there are 3 timelines that meet conditions, their IDs form the following array: ["45B87","3A584","C954T3"] |
| Content-Type: JSON |
|
- Click Test to check that the webhook is configured correctly.
You will get the POST request on the configured URL with test information. - Click Save.
Content types
While configuring a webhook, you can select the following content to send:
- Multipart
Such data consists of different parts, separated by a boundary. Each part is a separate entity and has its own HTTP headers.
Note. Specified event attributes are not included in Multipart content.
The sent document is broken into 2 parts: - A Webhook name value.
- An array that stores IDs for matched timelines.
Show example of multipart content
- JSON
The request will include a JSON file with specified event attributes. The sent data contains: - A Webhook name value.
- An array that stores IDs for matched timelines.
- An array, where each element includes timeline ID and connected attributes in the following format:
[{"id":"TimelineID", "EventName / AttributeName": "AttributeValue"}, {...}] - Custom property values.
Show example of JSON file with comments
JSON configuration example
Task: Create a webhook that sends a JSON file with information about a triggered alert.
Solution: In the Webhook window, select POST method, specify webhook URL and name. Select JSON as a content type. Set the name for an array with timeline IDs. Order IDs, for instance. Add a custom property, if needed. For example, enter Source in the Key field and Timeline in the Value field.

9/5/2024 4:23:54 PM