- Introducing ABBYY FlexiLayout Studio
- What's New In ABBYY FlexiLayout Studio 12
- Installing, running, and removing ABBYY FlexiLayout" Studio
- Program interface
- Projects
- Batches
- FlexiLayouts
- Multi-page FlexiLayout
- Pre-recognition
-
Elements
- Creating, copying, and deleting elements
- An overview of element properties
- Required and optional elements
- Element properties
- Search area
- Additional search constraints
- Units of measurement
- Fuzzy interval
- Specifying databases and text files in the FlexiLayout language
- Training elements
- Dependency browser
- Blocks
- Working with tables
-
Hypotheses and trees of hypotheses
- Hypotheses and optimizing the search
-
How hypotheses are generated and assessed
- Hypotheses for Static Text elements
- Hypotheses for Separator elements
- Hypotheses for White Gap elements
- Hypotheses for Barcode elements
- Hypotheses for Character String elements
- Hypotheses for Text Fragment elements
- Hypotheses for Date elements
- Hypotheses for Object Collection elements
- Hypotheses for Group elements
- Hypotheses for Phone elements
- Hypotheses for Currency elements
- Hypotheses for Table elements
- Hypotheses for Repeating Group elements
- Hypotheses for Labeled Field elements
- Hypotheses for Region elements
- Tree of hypotheses
- Debugging the FlexiLayout
- Classification
- Export
-
FlexiLayout language
- Basic concepts
-
Predefined types
- Void
- Logic
- String
- Int
- Distance
- XCoordinate
- YCoordinate
- Real
- Quality
- Area
- ImageObjectType
- DateFormats
- DayFormatVariants
- MonthFormatVariants
- YearFormatVariants
- XInterval
- YInterval
- DistInterval
- Rect
- FuzzyRect
- RectArray
- Region
- ImageObjectSet
- TextTypes
- BarcodeTypes
- BarcodeOrientations
- RecognitionMode
- Direction
- HorSearchAreaBound
- VertSearchAreaBound
- Hypothesis
- HypothesisInstances
- TableBlock
- TableBlockColumn
- TableBlockColumnArray
- TableHypothesis
- TableHypColumn
- TableColumnType
- CurrencyPositionTypes
- PageInterval
- PageArea
- PageEdge
- Page
- SearchAreaPageSetType
- IntArray
- StringArray
- IntFuzzyInterval
- DistFuzzyInterval
- AreaFuzzyInterval
- TextRotations
- Conversion of types
- Predefined constants
- Predefined variables
- Global functions
- Functions for working with named parameters
- Advanced pre-search functions
- Advanced post-search functions
- Specifying element properties
-
Hypotheses and their properties
- Object Collection hypothesis
- Character String hypothesis
- Static Text hypothesis
- Paragraph hypothesis
- Barcode hypothesis
- Date hypothesis
- Currency hypothesis
- Phone hypothesis
- Table hypothesis
- Table Column hypothesis
- Repeating Group hypothesis
- First Found hypothesis
- Labeled Field hypothesis
- Region hypothesis
- Hypotheses for all types of element
- Printing to debug
-
Tips and tricks
- Detecting dates in the case of low quality pre-recognition
- Setting multiple static text values. Search for static text with similar values
- Using Exclude to exclude elements
- Using Group elements to optimize FlexiLayout structure and search
- Searching for single-line Static Text elements
- Restricting the search area by means of RestrictSearchArea
- Searching for single-line fields of known or unknown format on documents of varying OCR quality
- Using Nearest and FuzzyQuality to search for elements
- Optimizing Group element search
- The "Optional" property of a Group element
- Searching for strings of digits
- Simplifying the FlexiLayout by using an auxiliary element and a null
- Describing text fields containing framed letters
-
Appendix
- Shortcut keys
- Properties of image objects detected during pre-recognition
- Supported input formats
- Barcodes supported in ABBYY FlexiLayout" Studio
- OCR languages supported in ABBYY FlexiLayout" Studio
- User dictionaries
- Alphabet used in regular expressions
- Extended regular expressions
-
Dialog boxes
- Options dialog box
- Fuzzy interval visual editor
-
Element Properties dialog box
- General tab
- Static Text tab
- Separator tab
- White Gap tab
- Barcode tab
- Character String tab
- Paragraph tab
- Date tab
- Object Collection tab
- Phone tab
- Currency tab
- Repeating Group tab
- Columns tab
- Order tab
- Header tab
- Footer tab
- Rows tab
- Label tab
- Field Position tab
- Field tab
- Search Constraints tab
- Relations tab
- Advanced tab
- Advanced for All Instances tab
- Errors tab
- End-User License Agreement
- Patents
- How to buy ABBYY FlexiCapture
- Third-party technologies
-
Tutorial
-
Sample 1
- Step 1: Creating a new project
- Step 2: Adding images to the batch
- Step 3: Setting the FlexiLayout properties
- Step 4: Pre-recognition
- Step 5: Viewing images and pre-recognition results
- Step 6: Analyzing pre-recognition results and selecting reference elements
- Step 7: Creating a form identifier
- Step 8: Testing the identifier element
- Step 9: Adjusting the properties of the identifier element
- Step 10: Describing the YOUR PLANET NAME field
- Step 11: Describing the YOUR PLANET NAME field with a PlanetNameHeader element
- Step 12: Describing the YOUR PLANET NAME field with a PlanetName element
- Step 13: Testing the YOUR PLANET NAME field
- Step 14: Describing the YOUR PLANET NAME field with a PlanetName block
- Step 15: Describing the NAME field
- Step 16: Describing the YOUR SPACESHIP NUMBER field
- Step 17: Describing the DATE YOU ARRIVED AT THE EARTH field
- Step 18: Describing the YOUR IDENTITY NUMBER ON THE PARTY field
- Step 19: Describing the ANY TEXT field
- Step 20: Describing the YOUR PHOTO IN FANCY DRESS field
- Step 21: Exporting the FlexiLayout
- Step 22: Opening the FlexiLayout in ABBYY FlexiCapture
-
Sample 2
- Step 1: Creating a new project
- Step 2: Adding images to the batch
- Step 3: Setting the FlexiLayout properties
- Step 4: Pre-recognition
- Step 5: Viewing images and pre-recognition results
- Step 6: Creating a document identifier
- Step 7: Testing the identifier element
- Step 8: Specifying the order in which the field Recipe # and the name for the recipe must be detected
- Step 9: Describing the Recipe # field
- Step 10: Creating a Recipe element
- Step 11: Creating a RecipeNumber element
- Step 12: Creating a RecipeNumber block
- Step 13: Describing the field which contains the name of the recipe
- Step 14: Describing the Ingredients field
- Step 15: Describing the field which contains the cooking instructions and the field which contains the cooking time
- Step 16: Creating a CookingTimeHeader element
- Step 17: Creating a CookingTime element
- Step 18: Creating a CookingTime block
- Step 19: Creating an InvertedHeader element
- Step 20: Describing the Cooking field
- Step 21: Creating a Serves element
- Step 22: Creating a Portions element
- Step 23: Describing the Cooking field
- Step 24: Creating a CookingDescription block
- Step 25: The FlexiLayout is ready
-
Sample 3
- Step 1: Preparatory settings
- Step 2: Visual analysis of the images and pre-recognition results
- Step 3: Blocks
- Step 4: Analyzing the images to decide in which order elements must be detected
- Step 5: Detecting the name of the Delivery Address field with a kwDeliveryAddress element
- Step 6: Detecting the name of the Invoice Number field with a kwInvoiceNumber element
- Step 7: Detecting the name of the Invoice Date field with a kwInvoiceDate element
- Step 8: Describing the Invoice Number field with an InvoiceNumber element
- Step 9: Describing the Invoice Date field: the grDate, InvoiceDate, and InvoiceDateAsString elements
- Step 10: Creating an grAddress element of type Group
- Step 11: Detecting the right boundary of the Delivery Address field with a wgAddressRight element
- Step 12: Describing the Delivery Address field with a DeliveryAddress element
- Step 13: Further analysis of the images
- Step 14: Detecting the auxiliary horizontal separator with an hsTableHeaderTop element
- Step 15: Analyzing the search constraints for column names with a TableHeader element of type Group
- Step 16: Detecting the name of the Quantity column with a kwQuantity element
- Step 17: Detecting the name of the Unit Price column with a kwUnitPrice element
- Step 18: Detecting the name of the Total column with a kwTotal element
- Step 19: Creating a InvertedHeader element
- Step 20: Describing the Footer group with a Footer element of type Group
- Step 21: Describing the footer of the table with a kwFooter element
- Step 22: Describing the name of the Total field with the kwTotal element
- Step 23: Detecting the name of the Country field with a kwOrigin element
- Step 24: Describing the Country field with a Country element
- Step 25: Detecting the TotalQuantity and TotalAmount fields with TotalQuantity and TotalAmount elements
- Step 26: Detecting the Table element with an InvoiceTable element
- Step 27: Exporting the FlexiLayout into ABBYY FlexiCapture
-
Sample 4
- Step 1: Preparatory settings
- Step 2: Viewing the images and pre-recognition results
- Step 3: Blocks
- Step 4: Analyzing the images to determine the order in which the elements should be detected
-
Step 5: Document header and InvoiceHeader group
- Step 5.1: Name of Invoice Number field, kwInvoiceNumber element
- Step 5.2: Name of Delivery Address field, kwDeliveryAddress element
- Step 5.3: Name of Invoice Date field, kwInvoiceDate element
- Step 5.4: Invoice Number field, InvoiceNumber element
- Step 5.5: Invoice Date field, grDate, InvoiceDate, and InvoiceDateAsString elements
- Step 5.6: Delivery Address field, grAddress, wgAddressAbove, and DeliveryAddress elements
- Step 6: Document Footer, InvoiceFooter group
-
Step 7: Table column names, TableHeader group
- Step 7.1: Name of Designation column, kwDesignation element
- Step 7.2: Name of ExtraQuantity column, ExtraQtyTag element
- Step 7.3: Name of Quantity column, kwQuantity element
- Step 7.4: Name of UnitPrice column, kwUnitPrice element
- Step 7.5: Name of Total column, kwTotal element
- Step 7.6: Name of Reference column, kwReference element
- Step 7.7: Name of Sales column, kwSales element
- Step 7.8: Name of Unit column, kwUnit element
- Step 8: Table element, InvoiceTable element
- Step 9: TotalAmount field, SumGroup group element
- Step 10: Company field, CompanyGroup group element, Company element
- Step 11: Exporting the FlexiLayout into FlexiCapture
-
Sample 1
- Technical support
- Glossary
Batch window
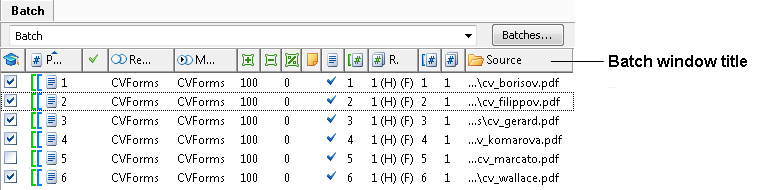
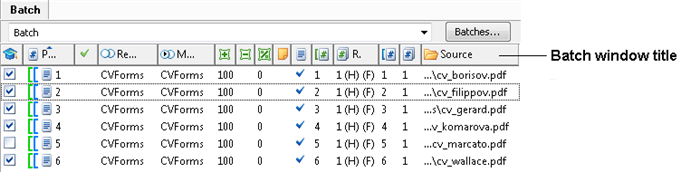
The Batch window contains a table of images collected for the purpose of creating or fine-tuning a FlexiLayout.
The table's columns contain information about the operations performed on each image.
Working with multiple batches
Important!The same FlexiLayout/Classifier is used for all the images in all the batches in the project.
ABBYY FlexiLayout Studio lets you work with multiple batches within one project. This lets you put images from different sources into groups and work with each group separately.
By default, every new project contains one batch. You can add, remove, and edit batches, provided that there remains at least one batch in the project.
How to create and edit a batch
To create a new batch or edit an existing one, open the Batches dialog box by clicking Batches... on the Batch menu or by clicking the Batches button in the Batch pane. The Batches dialog box contains a list of all existing batches and the following information about each batch:
- Name – the name of the batch
- Path – the name of the folder that contains information about the batch (the full path to this folder is indicated in the batch properties)
- Comment – user comments
- Total Pages – the number of pages in the batch
- Created – the date and time when the batch was created
- Modified – the date and time when the last change to the batch was made
Batch properties
To open the properties dialog box of a batch, click the Edit button.
The General tab contains the following information:
- Name – the name of the batch
- Comment – user comments
- Batch path – full path to the folder that contains all information about the batch (this path can be copied to the Clipboard)
- Pre-recognition – pre-recognition parameters of the batch
Note.By default, project settings are applied to all the batches in the project.
Batches can also have named parameters, which you can create and edit on the Named parameters tab of the properties dialog of a batch.
Managing batches
You can switch between batches using the drop-down list in the Batch pane or by selecting a batch in the Batches dialog box.
You can also move images from one batch to another. To do so, right-click an image and select Move Pages to Batch... on the shortcut menu or click Move Selected Pages to Another Batch on the Batch menu.
Shortcut menu commands for FlexiLayouts
Right-clicking the title of the window ("Batch") brings up a shortcut menu that can be used for adjusting the width of table columns and to display or hide columns.
- Fit Column Width fits the width of the column to the longest field.
- Fit All Columns Width fits the width of each column to the width of the longest field it contains.
The shortcut menu also displays all of the available properties of the pages contained in the batch.
- Use for Training indicates whether or not the page is used for training.
- Page No. shows the page number.
- Analyzed indicates whether or not a FlexiLayout has been applied to the page.
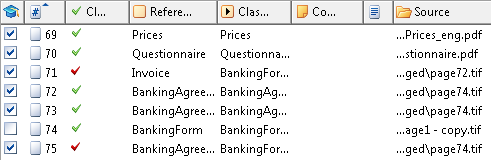
- Reference Alternative shows reference FlexiLayout alternative.
- Matched Alternative shows the name of the FlexiLayout applied to the page.
- Excess Areas shows the ratio (in percent) of the total area of blocks that were found when the FlexiLayout was applied but are not present in the reference layout to the total area of all blocks in the reference layout.
- Missing Areas shows the ratio (in percent) of the total area of reference layout blocks that were not found on the image when the FlexiLayout was applied to the total area of all blocks in the reference layout.
- Match Quality – the ratio (in percent) of all fields for which the applied region matches the reference region by more than 90%; this is a measure of how well the FlexiLayout matches the page. For text blocks, the percentage is calculated based on the number of correctly found characters. For all other fields, the percentage is calculated based on the area of the corresponding recognition objects.
- Comment shows the comment added for the image.
- Pre-recognized indicates whether or not pre-recognition was performed.
- Has source PDF indicates whether or not the text layer should be used.
- Reference Document Number shows the number of the document to which the page must be assigned according to the reference assembly.
- Reference Sequence Number shows the number of the page in the document that must be assigned to it based on the reference assembly. The number is followed by an (H) if a Header element must occur on the page, or by an (F) if a Footer element must occur on the page.
- Matched Document Number shows the number of the document to which the page was assigned when the FlexiLayout was applied.
- Matched Sequence Number shows the number that was assigned to the page when the FlexiLayout was applied. The number is followed by an (H) if a Header element was found on the page and an (F) if a Footer element was found on the page.
- Source shows the path to the image source file.
- Set Filter filters pages by column values. The name of the column whose values are used as filtering criteria will be marked with
. Not all columns may be used for filtering. To reset the filter, right click the name of the column and select Reset filter on the shortcut menu.
Note.Several values and/or columns can be used as filtering criteria, in which case pages that do not satisfy at least one criterion will be hidden. This feature is available for Analyzed, Reference Alternative, Matched Alternative, Reference Document Number, Reference Sequence Number, Matched Document Number, Matched Sequence Number, and Source.
- Training Layout State indicates how well the document matches the FlexiLayout, making it easier to find pages that were not completely marked up, e.g. when the document contains a different set of fields and reference elements. The Training Layout State item is only available in training mode and will only display the state of pages from training sets.
— No elements marked: no fields or reference elements are marked on the page.
— Has unmarked elements: the page contains unmarked fields and/or reference elements; some unmarked elements have not been classified as missing.
— Has unmarked required element: a required element has not been marked on the page.
— All elements marked: all elements have been marked; unmarked elements have been classified as missing.
— No reference class set: no reference class has been specified for a training page.
Shortcut menu commands for the classifier
- Fit Column Width fits the width of the column to the longest field.
- Fit All Columns Width fits the width of every column to the width of the longest field it contains.
- Use for Training indicates whether or not the page is used for training.
- Page No. shows the page number.
- Classification Fidelity indicates whether or not the value in the Classification Result column matches the value in the Reference Class column.
- Reference Class shows the reference classification result.
- Classification Result shows the classification result (text string).
- Comment shows the comment added for the image.
- Pre-recognized indicates whether pre-recognition was performed.
- Source shows the path to the image's source file.
- Set Filter filters pages by column values. The name of the column whose values are used as filtering criteria will be marked with
. Not all columns may be used for filtering. To reset the filter, right click the name of the column and select Reset filter on the shortcut menu.
Note.Several values and/or columns can be used as filtering criteria, in which case pages that do not satisfy at least one criterion will be hidden. This feature is available for Classification Fidelity, Reference Class, Classification Result, and Source.
Width settings and hiding columns
You can choose to display a column or hide it by clicking its name in the shortcut menu. A flag is displayed next to the names of visible columns. The batch window must contain at least one visible column, and the last visible column cannot be hidden.
The width and location of a column can also be changed using the mouse. To change the width, drag the column's edge until it is of the desired width. If you change the column's width to 0, it becomes hidden.
Note.The contents of the shortcut menu may differ depending on the situation. For example, if the Allow multipage documents parameter in the FlexiLayout properties is set to false, the commands related to multipage documents will not be available on the shortcut menu. If a project has only one alternative, the Match Selected Alternative item will not be available on the shortcut menu.
Tooltips
A tooltip is a small window that appears when you position the mouse pointer over an element of the graphical user interface and contains a brief description of the element. The tooltip of an interface element can change. For example, the tooltip for the icon in the Analyzed column can be either "Matching assembling differs from etalon" or "Matched with no reference alternative" depending on the state of the page.
Note.You can read more about the commands in the shortcut menu of batches in the Image shortcut menu article.
20.02.2021 12:32:39