- Introducing ABBYY FlexiLayout Studio
- What's New In ABBYY FlexiLayout Studio 12
- Installing, running, and removing ABBYY FlexiLayout" Studio
- Program interface
- Projects
- Batches
- FlexiLayouts
- Multi-page FlexiLayout
- Pre-recognition
-
Elements
- Creating, copying, and deleting elements
- An overview of element properties
- Required and optional elements
- Element properties
- Search area
- Additional search constraints
- Units of measurement
- Fuzzy interval
- Specifying databases and text files in the FlexiLayout language
- Training elements
- Dependency browser
- Blocks
- Working with tables
-
Hypotheses and trees of hypotheses
- Hypotheses and optimizing the search
-
How hypotheses are generated and assessed
- Hypotheses for Static Text elements
- Hypotheses for Separator elements
- Hypotheses for White Gap elements
- Hypotheses for Barcode elements
- Hypotheses for Character String elements
- Hypotheses for Text Fragment elements
- Hypotheses for Date elements
- Hypotheses for Object Collection elements
- Hypotheses for Group elements
- Hypotheses for Phone elements
- Hypotheses for Currency elements
- Hypotheses for Table elements
- Hypotheses for Repeating Group elements
- Hypotheses for Labeled Field elements
- Hypotheses for Region elements
- Tree of hypotheses
- Debugging the FlexiLayout
- Classification
- Export
-
FlexiLayout language
- Basic concepts
-
Predefined types
- Void
- Logic
- String
- Int
- Distance
- XCoordinate
- YCoordinate
- Real
- Quality
- Area
- ImageObjectType
- DateFormats
- DayFormatVariants
- MonthFormatVariants
- YearFormatVariants
- XInterval
- YInterval
- DistInterval
- Rect
- FuzzyRect
- RectArray
- Region
- ImageObjectSet
- TextTypes
- BarcodeTypes
- BarcodeOrientations
- RecognitionMode
- Direction
- HorSearchAreaBound
- VertSearchAreaBound
- Hypothesis
- HypothesisInstances
- TableBlock
- TableBlockColumn
- TableBlockColumnArray
- TableHypothesis
- TableHypColumn
- TableColumnType
- CurrencyPositionTypes
- PageInterval
- PageArea
- PageEdge
- Page
- SearchAreaPageSetType
- IntArray
- StringArray
- IntFuzzyInterval
- DistFuzzyInterval
- AreaFuzzyInterval
- TextRotations
- Conversion of types
- Predefined constants
- Predefined variables
- Global functions
- Functions for working with named parameters
- Advanced pre-search functions
- Advanced post-search functions
- Specifying element properties
-
Hypotheses and their properties
- Object Collection hypothesis
- Character String hypothesis
- Static Text hypothesis
- Paragraph hypothesis
- Barcode hypothesis
- Date hypothesis
- Currency hypothesis
- Phone hypothesis
- Table hypothesis
- Table Column hypothesis
- Repeating Group hypothesis
- First Found hypothesis
- Labeled Field hypothesis
- Region hypothesis
- Hypotheses for all types of element
- Printing to debug
-
Tips and tricks
- Detecting dates in the case of low quality pre-recognition
- Setting multiple static text values. Search for static text with similar values
- Using Exclude to exclude elements
- Using Group elements to optimize FlexiLayout structure and search
- Searching for single-line Static Text elements
- Restricting the search area by means of RestrictSearchArea
- Searching for single-line fields of known or unknown format on documents of varying OCR quality
- Using Nearest and FuzzyQuality to search for elements
- Optimizing Group element search
- The "Optional" property of a Group element
- Searching for strings of digits
- Simplifying the FlexiLayout by using an auxiliary element and a null
- Describing text fields containing framed letters
-
Appendix
- Shortcut keys
- Properties of image objects detected during pre-recognition
- Supported input formats
- Barcodes supported in ABBYY FlexiLayout" Studio
- OCR languages supported in ABBYY FlexiLayout" Studio
- User dictionaries
- Alphabet used in regular expressions
- Extended regular expressions
-
Dialog boxes
- Options dialog box
- Fuzzy interval visual editor
-
Element Properties dialog box
- General tab
- Static Text tab
- Separator tab
- White Gap tab
- Barcode tab
- Character String tab
- Paragraph tab
- Date tab
- Object Collection tab
- Phone tab
- Currency tab
- Repeating Group tab
- Columns tab
- Order tab
- Header tab
- Footer tab
- Rows tab
- Label tab
- Field Position tab
- Field tab
- Search Constraints tab
- Relations tab
- Advanced tab
- Advanced for All Instances tab
- Errors tab
- End-User License Agreement
- Patents
- How to buy ABBYY FlexiCapture
- Third-party technologies
-
Tutorial
-
Sample 1
- Step 1: Creating a new project
- Step 2: Adding images to the batch
- Step 3: Setting the FlexiLayout properties
- Step 4: Pre-recognition
- Step 5: Viewing images and pre-recognition results
- Step 6: Analyzing pre-recognition results and selecting reference elements
- Step 7: Creating a form identifier
- Step 8: Testing the identifier element
- Step 9: Adjusting the properties of the identifier element
- Step 10: Describing the YOUR PLANET NAME field
- Step 11: Describing the YOUR PLANET NAME field with a PlanetNameHeader element
- Step 12: Describing the YOUR PLANET NAME field with a PlanetName element
- Step 13: Testing the YOUR PLANET NAME field
- Step 14: Describing the YOUR PLANET NAME field with a PlanetName block
- Step 15: Describing the NAME field
- Step 16: Describing the YOUR SPACESHIP NUMBER field
- Step 17: Describing the DATE YOU ARRIVED AT THE EARTH field
- Step 18: Describing the YOUR IDENTITY NUMBER ON THE PARTY field
- Step 19: Describing the ANY TEXT field
- Step 20: Describing the YOUR PHOTO IN FANCY DRESS field
- Step 21: Exporting the FlexiLayout
- Step 22: Opening the FlexiLayout in ABBYY FlexiCapture
-
Sample 2
- Step 1: Creating a new project
- Step 2: Adding images to the batch
- Step 3: Setting the FlexiLayout properties
- Step 4: Pre-recognition
- Step 5: Viewing images and pre-recognition results
- Step 6: Creating a document identifier
- Step 7: Testing the identifier element
- Step 8: Specifying the order in which the field Recipe # and the name for the recipe must be detected
- Step 9: Describing the Recipe # field
- Step 10: Creating a Recipe element
- Step 11: Creating a RecipeNumber element
- Step 12: Creating a RecipeNumber block
- Step 13: Describing the field which contains the name of the recipe
- Step 14: Describing the Ingredients field
- Step 15: Describing the field which contains the cooking instructions and the field which contains the cooking time
- Step 16: Creating a CookingTimeHeader element
- Step 17: Creating a CookingTime element
- Step 18: Creating a CookingTime block
- Step 19: Creating an InvertedHeader element
- Step 20: Describing the Cooking field
- Step 21: Creating a Serves element
- Step 22: Creating a Portions element
- Step 23: Describing the Cooking field
- Step 24: Creating a CookingDescription block
- Step 25: The FlexiLayout is ready
-
Sample 3
- Step 1: Preparatory settings
- Step 2: Visual analysis of the images and pre-recognition results
- Step 3: Blocks
- Step 4: Analyzing the images to decide in which order elements must be detected
- Step 5: Detecting the name of the Delivery Address field with a kwDeliveryAddress element
- Step 6: Detecting the name of the Invoice Number field with a kwInvoiceNumber element
- Step 7: Detecting the name of the Invoice Date field with a kwInvoiceDate element
- Step 8: Describing the Invoice Number field with an InvoiceNumber element
- Step 9: Describing the Invoice Date field: the grDate, InvoiceDate, and InvoiceDateAsString elements
- Step 10: Creating an grAddress element of type Group
- Step 11: Detecting the right boundary of the Delivery Address field with a wgAddressRight element
- Step 12: Describing the Delivery Address field with a DeliveryAddress element
- Step 13: Further analysis of the images
- Step 14: Detecting the auxiliary horizontal separator with an hsTableHeaderTop element
- Step 15: Analyzing the search constraints for column names with a TableHeader element of type Group
- Step 16: Detecting the name of the Quantity column with a kwQuantity element
- Step 17: Detecting the name of the Unit Price column with a kwUnitPrice element
- Step 18: Detecting the name of the Total column with a kwTotal element
- Step 19: Creating a InvertedHeader element
- Step 20: Describing the Footer group with a Footer element of type Group
- Step 21: Describing the footer of the table with a kwFooter element
- Step 22: Describing the name of the Total field with the kwTotal element
- Step 23: Detecting the name of the Country field with a kwOrigin element
- Step 24: Describing the Country field with a Country element
- Step 25: Detecting the TotalQuantity and TotalAmount fields with TotalQuantity and TotalAmount elements
- Step 26: Detecting the Table element with an InvoiceTable element
- Step 27: Exporting the FlexiLayout into ABBYY FlexiCapture
-
Sample 4
- Step 1: Preparatory settings
- Step 2: Viewing the images and pre-recognition results
- Step 3: Blocks
- Step 4: Analyzing the images to determine the order in which the elements should be detected
-
Step 5: Document header and InvoiceHeader group
- Step 5.1: Name of Invoice Number field, kwInvoiceNumber element
- Step 5.2: Name of Delivery Address field, kwDeliveryAddress element
- Step 5.3: Name of Invoice Date field, kwInvoiceDate element
- Step 5.4: Invoice Number field, InvoiceNumber element
- Step 5.5: Invoice Date field, grDate, InvoiceDate, and InvoiceDateAsString elements
- Step 5.6: Delivery Address field, grAddress, wgAddressAbove, and DeliveryAddress elements
- Step 6: Document Footer, InvoiceFooter group
-
Step 7: Table column names, TableHeader group
- Step 7.1: Name of Designation column, kwDesignation element
- Step 7.2: Name of ExtraQuantity column, ExtraQtyTag element
- Step 7.3: Name of Quantity column, kwQuantity element
- Step 7.4: Name of UnitPrice column, kwUnitPrice element
- Step 7.5: Name of Total column, kwTotal element
- Step 7.6: Name of Reference column, kwReference element
- Step 7.7: Name of Sales column, kwSales element
- Step 7.8: Name of Unit column, kwUnit element
- Step 8: Table element, InvoiceTable element
- Step 9: TotalAmount field, SumGroup group element
- Step 10: Company field, CompanyGroup group element, Company element
- Step 11: Exporting the FlexiLayout into FlexiCapture
-
Sample 1
- Technical support
- Glossary
Toolbars
Standard toolbar
The Standard toolbar contains buttons which correspond to the standard commands such as creating, opening and saving FlexiLayouts.
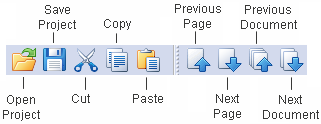
The buttons on the Standard toolbar:
Button | Description |
Open | Opens the Open Project dialog box where you can select a project file to open. |
Save | Saves the current project. |
Cut | Deletes the selection and places it into the Clipboard. |
Copy | Copies the selection (text in the Properties window, blocks in the Image window, pages in the Batch window, blocks or elements in the FlexiLayout window) into the Clipboard. |
Paste | Pastes the selection from the Clipboard. |
Previous Page | Opens the previous page in the project. |
Next Page | Opens the next page in the project. |
Previous Document | Opens the previous document in the project. |
Next Document | Opens the next document in the project. |
Extracted Objects toolbar
The Extracted Objects toolbar contains buttons which allow you to show/hide the objects detected during pre-recognition.
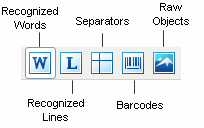
The Extracted Objects toolbar buttons:
Button | Description |
Recognized Words | Displays only the objects classified as Text during pre-recognition. |
Recognized Lines | Displays only the objects classified as Recognized Lines during pre-recognition. |
Separators | Displays only the objects classified as Separators during pre-recognition. |
Barcodes | Displays only the objects classified as Barcodes during pre-recognition. |
Raw Objects | Displays only the objects which the program managed to classify during pre-recognition. |
Block-Drawing Tools toolbar
The Block-Drawing Tools toolbar contains buttons which allow you to edit the reference layout.
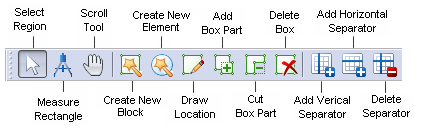
The Block-Drawing tools toolbar buttons:
Button | Description |
Select Region |
Selects a region on the image and moves the selected block. Sometimes a block may be too small to be moved, as its borders are very close to one another and pointing the mouse on any of them will activate the "change size" mode. Hold down the Ctrl key to move such blocks. |
Measure Rectangle |
Detects the coordinates and sizes of objects on the image and copies them to the Clipboard. To measure an object on the current image, activate the Measure Tool and select the rectangular area to be measured: right-click one corner of the area, drag the mouse diagonally into the opposite corner, and release the mouse. The Measure Tool dialog box displays the coordinates and the width and height of the measured object in the user-defined units of measurement. If you select Automatically copy results to Clipboard in the Measure Tool dialog box, the coordinates of the rectangle will be copied to the Clipboard so that you can easily paste them, for example, on the Search Constraints tab in the Properties dialog box of any element to define its search area. |
Scroll Tool | Scrolls the image in the Image window. |
Create Element | Creates a new block or element and allows you to specify its properties based on the pre-recognized image. |
Draw Location |
Draws an area on the image corresponding to the selected block or element.
|
Add Block Part |
Adds a rectangular area to the selected area.
|
Cut Block Part |
Cuts a rectangular area from the selected area.
|
Delete Box |
Deletes a block or element from the image.
|
Add Vertical Separator |
Adds a vertical separator to the selected Table block.
|
Add Horizontal Separator |
Adds a horizontal separator to the selected Table block.
|
Delete Separator |
Deletes a separator from the selected Table block.
|
Layout toolbar
The Layout toolbar contains buttons which allow you to view the test images in different modes.
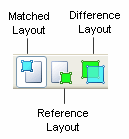
The Layout toolbar buttons:
Button | Description |
Matched layout | Displays the image in Matched layout mode. Use the arrow to the right to select the objects to be displayed: blocks, elements, or both. |
Reference layout | Displays the image in Reference layout mode. |
Difference layout | Displays the image in Difference layout mode. |
Image Tools toolbar
The Image Tools toolbar contains buttons which correspond to the standard commands such as rotating and scaling the selected image(s).
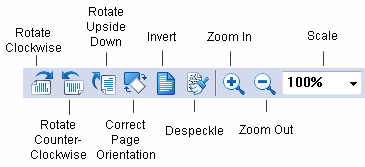
The buttons on the Image Tool toolbar:
Button | Description |
Rotate Clockwise | Rotates the image by 90° clockwise. |
Rotate Counter-Clockwise | Rotates the image by 90° counter-clockwise. |
Rotate Upside Down | Rotates the image by 180°. |
Correct Page Orientation | Auto corrects the orientation of pages. The correct orientation is selected automatically based on the selected pre-recognition language and the settings made in the Options dialog box (Tools → Options). |
Invert | Inverts the image (turns black into white and vice versa). |
Despeckle | Removes excess dots from the image. |
Zoom In | Makes the image twice as large. |
Zoom Out | Makes the image twice as small. |
Scale | Scales the image. |
Note.When you perform image operations, all the pre-recognition and FlexiLayout matching results are deleted. When rotating and flipping images, the Reference Layout is also deleted.
14.01.2021 14:17:19