- Introducing ABBYY FlexiLayout Studio
- What's New In ABBYY FlexiLayout Studio 12
- Installing, running, and removing ABBYY FlexiLayout" Studio
- Program interface
- Projects
- Batches
- FlexiLayouts
- Multi-page FlexiLayout
- Pre-recognition
-
Elements
- Creating, copying, and deleting elements
- An overview of element properties
- Required and optional elements
- Element properties
- Search area
- Additional search constraints
- Units of measurement
- Fuzzy interval
- Specifying databases and text files in the FlexiLayout language
- Training elements
- Dependency browser
- Blocks
- Working with tables
-
Hypotheses and trees of hypotheses
- Hypotheses and optimizing the search
-
How hypotheses are generated and assessed
- Hypotheses for Static Text elements
- Hypotheses for Separator elements
- Hypotheses for White Gap elements
- Hypotheses for Barcode elements
- Hypotheses for Character String elements
- Hypotheses for Text Fragment elements
- Hypotheses for Date elements
- Hypotheses for Object Collection elements
- Hypotheses for Group elements
- Hypotheses for Phone elements
- Hypotheses for Currency elements
- Hypotheses for Table elements
- Hypotheses for Repeating Group elements
- Hypotheses for Labeled Field elements
- Hypotheses for Region elements
- Tree of hypotheses
- Debugging the FlexiLayout
- Classification
- Export
-
FlexiLayout language
- Basic concepts
-
Predefined types
- Void
- Logic
- String
- Int
- Distance
- XCoordinate
- YCoordinate
- Real
- Quality
- Area
- ImageObjectType
- DateFormats
- DayFormatVariants
- MonthFormatVariants
- YearFormatVariants
- XInterval
- YInterval
- DistInterval
- Rect
- FuzzyRect
- RectArray
- Region
- ImageObjectSet
- TextTypes
- BarcodeTypes
- BarcodeOrientations
- RecognitionMode
- Direction
- HorSearchAreaBound
- VertSearchAreaBound
- Hypothesis
- HypothesisInstances
- TableBlock
- TableBlockColumn
- TableBlockColumnArray
- TableHypothesis
- TableHypColumn
- TableColumnType
- CurrencyPositionTypes
- PageInterval
- PageArea
- PageEdge
- Page
- SearchAreaPageSetType
- IntArray
- StringArray
- IntFuzzyInterval
- DistFuzzyInterval
- AreaFuzzyInterval
- TextRotations
- Conversion of types
- Predefined constants
- Predefined variables
- Global functions
- Functions for working with named parameters
- Advanced pre-search functions
- Advanced post-search functions
- Specifying element properties
-
Hypotheses and their properties
- Object Collection hypothesis
- Character String hypothesis
- Static Text hypothesis
- Paragraph hypothesis
- Barcode hypothesis
- Date hypothesis
- Currency hypothesis
- Phone hypothesis
- Table hypothesis
- Table Column hypothesis
- Repeating Group hypothesis
- First Found hypothesis
- Labeled Field hypothesis
- Region hypothesis
- Hypotheses for all types of element
- Printing to debug
-
Tips and tricks
- Detecting dates in the case of low quality pre-recognition
- Setting multiple static text values. Search for static text with similar values
- Using Exclude to exclude elements
- Using Group elements to optimize FlexiLayout structure and search
- Searching for single-line Static Text elements
- Restricting the search area by means of RestrictSearchArea
- Searching for single-line fields of known or unknown format on documents of varying OCR quality
- Using Nearest and FuzzyQuality to search for elements
- Optimizing Group element search
- The "Optional" property of a Group element
- Searching for strings of digits
- Simplifying the FlexiLayout by using an auxiliary element and a null
- Describing text fields containing framed letters
-
Appendix
- Shortcut keys
- Properties of image objects detected during pre-recognition
- Supported input formats
- Barcodes supported in ABBYY FlexiLayout" Studio
- OCR languages supported in ABBYY FlexiLayout" Studio
- User dictionaries
- Alphabet used in regular expressions
- Extended regular expressions
-
Dialog boxes
- Options dialog box
- Fuzzy interval visual editor
-
Element Properties dialog box
- General tab
- Static Text tab
- Separator tab
- White Gap tab
- Barcode tab
- Character String tab
- Paragraph tab
- Date tab
- Object Collection tab
- Phone tab
- Currency tab
- Repeating Group tab
- Columns tab
- Order tab
- Header tab
- Footer tab
- Rows tab
- Label tab
- Field Position tab
- Field tab
- Search Constraints tab
- Relations tab
- Advanced tab
- Advanced for All Instances tab
- Errors tab
- End-User License Agreement
- Patents
- How to buy ABBYY FlexiCapture
- Third-party technologies
-
Tutorial
-
Sample 1
- Step 1: Creating a new project
- Step 2: Adding images to the batch
- Step 3: Setting the FlexiLayout properties
- Step 4: Pre-recognition
- Step 5: Viewing images and pre-recognition results
- Step 6: Analyzing pre-recognition results and selecting reference elements
- Step 7: Creating a form identifier
- Step 8: Testing the identifier element
- Step 9: Adjusting the properties of the identifier element
- Step 10: Describing the YOUR PLANET NAME field
- Step 11: Describing the YOUR PLANET NAME field with a PlanetNameHeader element
- Step 12: Describing the YOUR PLANET NAME field with a PlanetName element
- Step 13: Testing the YOUR PLANET NAME field
- Step 14: Describing the YOUR PLANET NAME field with a PlanetName block
- Step 15: Describing the NAME field
- Step 16: Describing the YOUR SPACESHIP NUMBER field
- Step 17: Describing the DATE YOU ARRIVED AT THE EARTH field
- Step 18: Describing the YOUR IDENTITY NUMBER ON THE PARTY field
- Step 19: Describing the ANY TEXT field
- Step 20: Describing the YOUR PHOTO IN FANCY DRESS field
- Step 21: Exporting the FlexiLayout
- Step 22: Opening the FlexiLayout in ABBYY FlexiCapture
-
Sample 2
- Step 1: Creating a new project
- Step 2: Adding images to the batch
- Step 3: Setting the FlexiLayout properties
- Step 4: Pre-recognition
- Step 5: Viewing images and pre-recognition results
- Step 6: Creating a document identifier
- Step 7: Testing the identifier element
- Step 8: Specifying the order in which the field Recipe # and the name for the recipe must be detected
- Step 9: Describing the Recipe # field
- Step 10: Creating a Recipe element
- Step 11: Creating a RecipeNumber element
- Step 12: Creating a RecipeNumber block
- Step 13: Describing the field which contains the name of the recipe
- Step 14: Describing the Ingredients field
- Step 15: Describing the field which contains the cooking instructions and the field which contains the cooking time
- Step 16: Creating a CookingTimeHeader element
- Step 17: Creating a CookingTime element
- Step 18: Creating a CookingTime block
- Step 19: Creating an InvertedHeader element
- Step 20: Describing the Cooking field
- Step 21: Creating a Serves element
- Step 22: Creating a Portions element
- Step 23: Describing the Cooking field
- Step 24: Creating a CookingDescription block
- Step 25: The FlexiLayout is ready
-
Sample 3
- Step 1: Preparatory settings
- Step 2: Visual analysis of the images and pre-recognition results
- Step 3: Blocks
- Step 4: Analyzing the images to decide in which order elements must be detected
- Step 5: Detecting the name of the Delivery Address field with a kwDeliveryAddress element
- Step 6: Detecting the name of the Invoice Number field with a kwInvoiceNumber element
- Step 7: Detecting the name of the Invoice Date field with a kwInvoiceDate element
- Step 8: Describing the Invoice Number field with an InvoiceNumber element
- Step 9: Describing the Invoice Date field: the grDate, InvoiceDate, and InvoiceDateAsString elements
- Step 10: Creating an grAddress element of type Group
- Step 11: Detecting the right boundary of the Delivery Address field with a wgAddressRight element
- Step 12: Describing the Delivery Address field with a DeliveryAddress element
- Step 13: Further analysis of the images
- Step 14: Detecting the auxiliary horizontal separator with an hsTableHeaderTop element
- Step 15: Analyzing the search constraints for column names with a TableHeader element of type Group
- Step 16: Detecting the name of the Quantity column with a kwQuantity element
- Step 17: Detecting the name of the Unit Price column with a kwUnitPrice element
- Step 18: Detecting the name of the Total column with a kwTotal element
- Step 19: Creating a InvertedHeader element
- Step 20: Describing the Footer group with a Footer element of type Group
- Step 21: Describing the footer of the table with a kwFooter element
- Step 22: Describing the name of the Total field with the kwTotal element
- Step 23: Detecting the name of the Country field with a kwOrigin element
- Step 24: Describing the Country field with a Country element
- Step 25: Detecting the TotalQuantity and TotalAmount fields with TotalQuantity and TotalAmount elements
- Step 26: Detecting the Table element with an InvoiceTable element
- Step 27: Exporting the FlexiLayout into ABBYY FlexiCapture
-
Sample 4
- Step 1: Preparatory settings
- Step 2: Viewing the images and pre-recognition results
- Step 3: Blocks
- Step 4: Analyzing the images to determine the order in which the elements should be detected
-
Step 5: Document header and InvoiceHeader group
- Step 5.1: Name of Invoice Number field, kwInvoiceNumber element
- Step 5.2: Name of Delivery Address field, kwDeliveryAddress element
- Step 5.3: Name of Invoice Date field, kwInvoiceDate element
- Step 5.4: Invoice Number field, InvoiceNumber element
- Step 5.5: Invoice Date field, grDate, InvoiceDate, and InvoiceDateAsString elements
- Step 5.6: Delivery Address field, grAddress, wgAddressAbove, and DeliveryAddress elements
- Step 6: Document Footer, InvoiceFooter group
-
Step 7: Table column names, TableHeader group
- Step 7.1: Name of Designation column, kwDesignation element
- Step 7.2: Name of ExtraQuantity column, ExtraQtyTag element
- Step 7.3: Name of Quantity column, kwQuantity element
- Step 7.4: Name of UnitPrice column, kwUnitPrice element
- Step 7.5: Name of Total column, kwTotal element
- Step 7.6: Name of Reference column, kwReference element
- Step 7.7: Name of Sales column, kwSales element
- Step 7.8: Name of Unit column, kwUnit element
- Step 8: Table element, InvoiceTable element
- Step 9: TotalAmount field, SumGroup group element
- Step 10: Company field, CompanyGroup group element, Company element
- Step 11: Exporting the FlexiLayout into FlexiCapture
-
Sample 1
- Technical support
- Glossary
Table rows
After the program has detected the columns, it starts to look for rows. FlexiLayout Studio can detect rows automatically by relying on the black separators and white gaps.
Sometimes a column may contain a fairly large fragment of text (e.g. a long description of a product). In this case the text is often carried over to the next line and white gaps between these lines should be ignored when dividing the table into rows. If the number of text lines in a cell varies from column to column, you can use one or more 'master' columns to divide the table into rows. The rows of the 'master' columns will be used as a pattern for the entire table.
You can select a method of dividing a table into rows and specify the properties of the rows in the Properties dialog box of the Table element (Rows tab).
Show Properties dialog box, Rows tab
Automatic detection of rows
To detect rows automatically, select the Detect rows automatically option. The program will rely on the black separators and white gaps present in all of the columns to divide them into rows.
If you wish each line of text to be marked as a row, select One line of text corresponds to one row.
Using master columns to detect rows
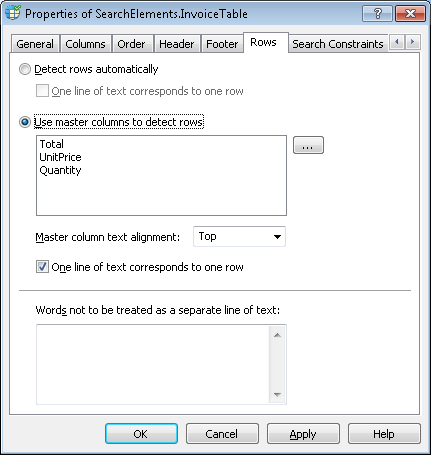
If a table has columns whose data define the splitting of the table into rows, you must select the Use master columns to detect rows option and specify the desired columns in the list of the so-called Master columns. The first Master column detected on the image will be used to detect rows of the table.
Select the columns whose rows will be used to divide the rest of the columns into rows. Since the composition of columns may vary from image to image, the list of master columns must cover all the possible variations. To create a list of master columns:
- Click the
button next to the Use master columns to detect rows option
- In the Select Master Columns dialog box, select the required columns from the List1 list and click
. The names of the selected columns will be displayed in the List2 list. Then use the
and
buttons to arrange the columns in order of priority. The top-most column that the program finds on the image will be used for detecting rows.
- Click OK to display the selected columns in the Use master columns to detect rows list.
To edit the list of master columns, click . Then use the
,
,
,
, and
buttons to make the necessary changes to the List2 list.
To specify how text within the cells of the master columns should be aligned, use Master column text alignment. Top specifies alignment by the top border and Bottom specifies alignment by the bottom border.
Select One line of text corresponds to one row if you wish the program to draw a row for each line of text in master column.
Words and phrases for which the program must not draw rows
Some tables may contain narrow columns which contain numerical data accompanied by units of measurement (e.g. sums of money with currency symbols). If the unit of measurement does not fit on the same line, it may be carried over to the next line. In this case the column will contain additional lines of text. To prevent the program from drawing separate rows for such lines, you can add such carried currency symbols, units of measurement etc. to the list of Words not to be treated as a separate line of text.
To create a list of stop words or phrases which do not merit a separate row, type such words or phrases into the Words not to be treated as a separate line of text field. Press Enter after typing each word or phrase.
Note.Words you type in the Words not to be treated as a separate line of text field are used both when detecting rows automatically and when detecting rows by means of master columns.
1/14/2021 2:17:19 PM