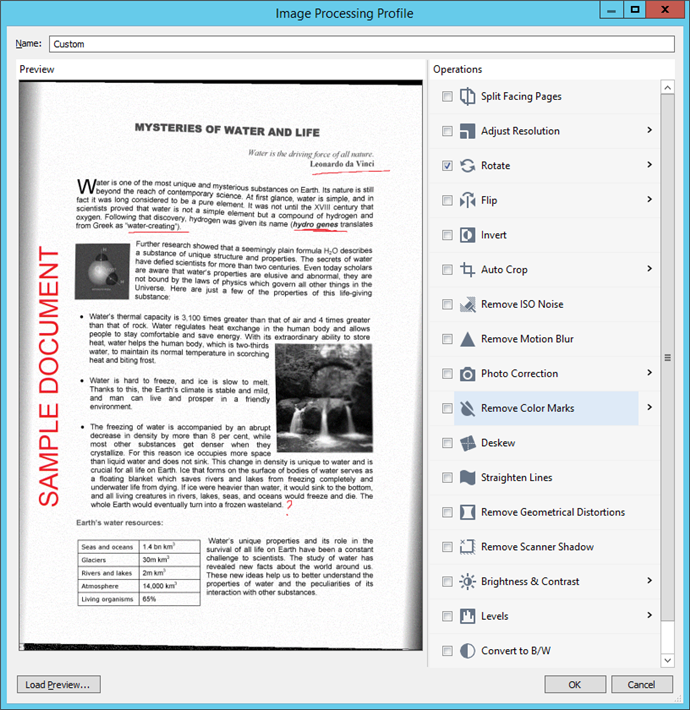
Dialog Box: Image Processing Profile
To access this dialog box, click either the New... button or the Edit... button in the Image Processing Profile Manager dialog box. Alternatively, you can click the Edit... button in the Advanced Processing Settings dialog box.

Use the Name box to enter a name for a new profile or edit the name of an existing one, except for predefined profiles.
The Operations pane is used to select the appropriate image processing option or combination of options.
The Preview pane displays the result of applying the selected option(s) to a sample image. Click the Load preview... button to select another image for sampling. Any selected option can be disabled in the preview.
| Option | Description |
| Split Facing Pages |
Divides facing pages into two separate single pages.
|
| Adjust Resolution |
Corrects the photo resolution. When this option is enabled (by default), the program automatically optimizes the resolution of images for processing. The new image resolution is retained for later processing stages.
|
|
Rotate (drop-down list) |
Specifies what type of rotation will be performed upon the image during preprocessing:
|
| Flip |
Mirrors an image:
|
| Invert | Inverts the image colors. |
| Auto Crop |
Automatically determines page borders on an image and crops the area containing the data that needs to be extracted. It also corrects skewing and distortions. Has 3 different modes:
|
| Remove ISO Noise | Suppresses digital noise on images. |
| Remove Motion Blur | Corrects blurring caused by document or camera/scanner movement. |
| Photo Correction |
|
| Remove Color Marks |
Removes all non-gray marking from an image. To manually choose a marking color to remove (for example, remove blue stamps and retain green headings), enable the Remove marks of specified colors only and choose the appropriate colors. |
| Deskew | Corrects image skewing. Enable this option to automatically correct skewing in an image. |
| Straighten Lines | Corrects line distortions that may occur when scanning partially curved pages. |
| Remove Geometrical Distortions |
Corrects geometrical distortions.
|
| Remove Scanner Shadow | Removes stripes that sometimes occur when scanning a document. |
| Brightness Contrast |
Lets the user adjust image brightness and contrast. Manual. This option lets the user manually adjust the Brightness and Contrast levels using sliders. Autolevels. Enabled by default. |
| Levels |
This tool lets you adjust the color levels of the images and set the intensity of shadows, light, and halftones. To increase the contrast of an image, move the left and right sliders on the input levels histogram. The range of colors between lightest and darkest is divided into 255 increments. The left slider sets the color that will be considered to be the blackest part of the image, and the right slider sets the color that will be considered to be the whitest part of the image. Moving the middle slider to the right will darken the image, and moving it to the left will lighten the image. Adjust the output level slider to decrease the contrast of the image.
|
| Convert to B/W | Converts an image to black and white. |
| Despeckle |
Removes small foreign elements from an image. The size of the elements that will be deleted is determined automatically, but it can be changed in the additional options. This feature can only be applied to black and white images.
|
26.03.2024 13:49:49
 Note. After being split, both pages will be processed individually, meaning that the number of pages remaining for a license will decrease by 2 instead of 1.