Scheduled File Upload via SFTP
One of the channels for uploading data to ABBYY Timeline is SFTP. You can upload files to Timeline automatically on a schedule or manually using any standard SFTP client that does not require read access to the destination folder. For example, you can use the free OpenSSH utility for Linux, macOS, and Windows and WinSCP for Windows and macOS.
Timeline configures the SFTP destination and shares the location and credentials with the client for the scheduled file push. The data upload from the SFTP server is then an automated process where the files are automatically picked up and processed to a project or repository.
Important. Before you get started, make sure you're aware of the limitations when using scheduled file upload via SFTP. For details, see Limitations when uploading via SFTP.
Basic steps to use file upload if using Timeline in the cloud through an ABBYY SAAS instance
This instruction will help you set up a scheduled data upload if you are using Timeline through an ABBYY SAAS instance in the cloud. To configure scheduled data upload if using Timeline instance deployed on-premises on Linux or Windows systems, go to Basic steps to use scheduled file upload if Timeline instance deployed on-premises.
- Generate your public key (which everybody is allowed to know) and a private key (which you keep secret and do not give to anybody).
Please refer to your SFTP client documentation for instructions or examples below. - Submit a request to the ABBYY technical support service on this page to send the public key.
Support will send you a username and SFTP server name in response. - Create a manifest.json file.
This manifest in JSON format contains instructions on uploading data files to Timeline.
For detailed instructions on creating a manifest file, see Manifest File. - ZIP together the manifest and your data file(s) and upload the ZIP to the SFTP server.
When creating a ZIP file, use the Deflate compression method. You will need to use archiving software that supports this method of compression, for example, use 7Zip or PeaZip.
See Data Requirements for other mandatory that your uploaded data must meet.
Important. The program does not support the Deflate64 compression method.
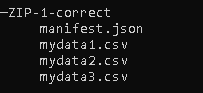
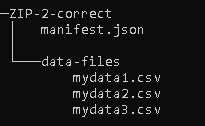
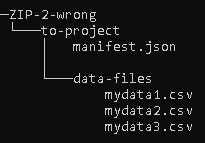
All files to be uploaded must be listed in a single manifest.json file and zipped along with it. manifest.json must be at the root of ZIP.Examples of ZIPs

- Timeline will send an email notification with the results of the data upload and processing to the email address specified in the manifest.
Notifications will also have attached documents with additional information about the reported upload events.
More detailed information about each upload event is also available in the History of the corresponding project or repository (depending on where you uploaded your data).
Basic steps to use file upload if Timeline instance deployed on-premises
This instruction will help you set up a scheduled data upload if you are using a Timeline instance deployed on-premises on Linux or Windows systems. When installing on-premises, you can use the background-upload feature that involves a folder that is monitored for files copied there. Whenever a new ZIP file is detected in that folder, the application grabs it and interprets it as an uploaded archive.
- Create a manifest.json file.
This manifest in JSON format contains instructions on uploading data files to Timeline.
For detailed instructions on creating a manifest file, see Manifest File. - ZIP your data file(s).
See Data Requirements for the conditions that your uploaded data must meet. - Copy the manifest.json and ZIP to the destination folder on the server running Timeline:
- If Timeline is deployed on-premises on Linux, this is the folder specified in STORAGE/sftp variable in the .env file.
Default value: /opt/timeline/storage - If Timeline is deployed on-premises on Windows, this is the $INSTALLDIR/storage/sftp folder.
Example of generating a public key
Instructions below show how to generate a public key using the PuTTY application. Instructions for your SFTP client might be different from the example.
To generate a public key on a Windows machine:

To generate a public key on a MAC or Linux machine:
9/5/2024 4:23:55 PM