- Introducing ABBYY FlexiCapture
- Installing and running the program
- ABBYY FlexiCapture architecture
-
Program settings
- ABBYY FlexiCapture Setup
- Multitenancy
- Creating a project
-
Document Definitions
- Creating fixed Document Definitions
- Creating Document Definitions for semi-structured documents
- Document Definitions without automatic fields extraction
- Document sets
-
Document Definition fields
- Text entry fields
- Checkmarks
- Checkmark groups
- Barcodes
- Pictures
- Tables
- Field group
- Service fields
- Index fields
- Link to an existing field
- Fields without a region
- Creating a field with a non-rectangular region
- Fields with several instances
- Fields with several regions
- How to change a field name
- Copying, moving, deleting fields
- Exclusion of a region from recognition
- Document Definition Wizard
- Editing and publishing a Document Definition
- Creating Document Definitions
- Document Definition properties
- Properties of a Document Definition section
- Rule validation
- Export settings
- Configuring data presentation in the document window
- Testing Document Definitions
- Localizing a Document Definition
- Classification
- Field extraction training
- Operating a configured project
-
ABBYY FlexiCapture for Invoices
- Features of ABBYY FlexiCapture for Invoices
- How to capture invoices
-
How to set up an invoice capture project
- Country and language settings
- Connecting vendor and business unit databases
- Data export settings
- The status of documents in ABBYY FlexiCapture for Invoices projects
- Training ABBYY FlexiCapture for Invoices
- Rules
- Capturing additional invoice fields
- Purchase Order Matching
- Enabling additional program features for operators
- Using multiple Document Definitions
- Editing invoice processing settings in XML files
- Updating the Document Definition for invoices
- Tax systems
- Specifications
- Capturing receipts
- Capturing purchase orders
- Using NLP to process unstructured documents
- ABBYY FlexiCapture interface
-
Appendix
-
Using scripts in ABBYY FlexiCapture
- Specifics of scripts written in .Net languages
- External assemblies
- Object model
-
Scripts for customizing processing stages
-
Types of scripts
- Script rule
- Autocorrection script
- Export script
- User script (custom action)
- Document assembly script
- Custom recognition script
- Stage rule
- Processing scripts
- Data set update script
- Data set validation scripts
- Document classification script
-
Event handlers
- Batch created
- Batch deleted
- Batch parameter change
- Batch structure change (page added/page deleted/document added/document deleted)
- Pages moved
- Batch opened/closed
- Batch integrity check
- Document parameter changed
- Document state changed
- Export completed
- Script that is run after rule checks
- Before matching
- Field verification request
-
Objects
- IActionResult
- IAssemblingError
- IAssemblingErrors
- IBatch
- IBatchCheckResults
- IBatchItem
- IBatchItems
- IBatchTypeClassifier
- IBatchTypeClassifierResult
- IBinarizationParams
- IBoxedBoolean
- ICharacterParams
- ICharactersParams
- ICheckmarkGroupValue
- ICheckmarkValue
- IDataSet
- IDataSetQuery
- IDataSetRecord
- IDocument
- IDocuments
- IDocumentExportResults
- IDocumentsExportResults
- IDocumentDefinitionInfo
- IDocumentDefinitionInfoArray
- IEditablePictureObject
- IExportFieldsToRedact
- IExportImageSavingOptions
- IField
- IFieldRegion
- IFieldRegions
- IFields
- IFlexiCaptureTools
- ILocalContrastParams
- IMatchedSectionInfo
- IMatchingInfo
- IPage
- IPageClassificationResult
- IPages
- IPictureObject
- IPictureObjectsInfo
- IPrincipal
- IPrincipals
- IProcessingCallback
- IProject
- IProperties
- IProperty
- IPropertyModificationInfo
- IRecordCheckResult
- IRecordset
- IRect
- IRects
- IRoutingRuleResult
- IRuleContext
- IRuleError
- IRuleErrors
- IRuleTag
- IRuleTags
- IScriptBinaryAttributes
- IScriptDefinitionContext
- ISectionDefinitionInfo
- ISectionDefinitionInfoArray
- IShadowsHighlightsParams
- IStageInfo
- IUserAttachment
- IUserAttachments
- IUserSessionInfo
- IValue
- IVARIANTArray
- TAssemlingErrorType
- TBatchItemType
- TColorToFilter
- TExportFieldType
- TExportType
- TImageCompressionType
- TPageClassificationType
- TPdfAVersion
- TPdfDocumentInfoType
- TPdfTextSearchAreaType
- TPrincipalType
- TProcessingPriority
- TPropertyType
- TRuleErrorType
- TStateType
- Sample scripts
- Internal names of recognition languages
-
Types of scripts
-
Scripts for processing interface events
-
Event handlers
- On Document Closed
- On Project Closed
- On Activate Document
- On Field Control Activate
- On Return From Task
- On User Command
- On Field Control Deactivate
- On Closing Document
- On Task Close
- On Closing Project
- On Region Change
- On Task Window Mode Changed
- On Open Document
- On Task Window Create
- On Task Reject
- On Region Control Draw
- On Task Send To Stage
- On Text Field Validating
-
Objects
- IBoolean
- IBoxedFieldControl
- IDocumentEditor
- IDocumentItem
- IDocumentItems
- IDocumentsCollection
- IDocumentsWindow
- IDrawContext
- IErrorControl
- IErrorControls
- IErrorsWindow
- IFieldControl
- IFieldRegionControl
- IFieldRegionControls
- IFormWindow
- IImageWindow
- IMainMenu
- IMainWindow
- IMenu
- IMenuItem
- IPageControl
- IPageItem
- IPageItems
- IPagesCollection
- IPoint
- ISelection
- IShellRational
- IShellRect
- IShellRects
- ITaskWindow
- ITextEditor
- IToolbar
- IToolbarButton
- IToolbars
- TCommandBarType
- TCommandID
- TDockingType
- TDocumentState
- TErrorType
- TSelectionType
- TTaskWindowMode
- TTextSize
- TUserRole
- TWorkWindowType
-
Event handlers
- User scripts for the Web Verification Station
- Creating a machine-readable form
- Hot keys
- Additional options
- Description of Processing Server commands
- ABBYY FlexiCapture sample projects
- Supported recognition languages
- Supported classifier languages
- Fonts for correct characters rendering
- Supported text types
- Supported barcode types
- Supported input formats
- Processing PDF files
- Export file formats
- Date formats
- Alphabet used in regular expressions
- Patents
- Third-party technologies
- Glossary
- Technical support
- How to buy ABBYY FlexiCapture
- End-User License Agreement (EULA)
-
Using scripts in ABBYY FlexiCapture
Creating custom data types
To create a new data type, select the desired item from the Data type list on the Data tab of the field's properties. You can select any item from the list that corresponds to the semantics of your custom data type: this will not affect the nature of the new data type, but it will be stored in the selected category.
Click the Edit... button to the right of the Details field.
In the dialog box that opens, select Special in the Content settings field.
Click the New... button to the right of the Data types for selected language field.
Follow the instructions of the data type creation wizard.
In the first window pf the wizard, select how your data is to be created. You can create a new data type based on a dictionary, a regular expression, an alphabet, or an existing data type (e.g. by adding desired characters to its alphabet or by expanding its dictionary).
To create a new data type based on a dictionary, a regular expression or an alphabet:
- Select New data type based on and then select the basis to be used for your new data type: a dictionary, a regular expression or an alphabet. Then select Language (locale) for your data type and click Next.
- If you choose to create a new data type based on a dictionary, in the next window the wizard will prompt you to select the type of dictionary to be used.
Select Use built-in dictionary if you wish to use the built-in dictionary for the language selected in the previous window. To check if the dictionary contains a particular word, click View... and type the word. Clicking the View button will either display the inflected forms of the word or a warning message saying that there is no such word in the dictionary.
Select Use custom dictionaries if you wish to use a custom dictionary and click Edit... to edit the dictionary. You can create a custom dictionary either by adding words to one by one (click the Add... button to add a word), or by loading a list of words from a file (click the Load... button and specify the path to the desired file with the extension *.txt or *.dic). Click Next.Note: The DIC file is a Microsoft Office custom dictionary. This is a plain text file with a list of words, one word by line.
Note: For a custom dictionary that contains words of the following type:
201.01.063.030
201.01.063.031
201.01.063.040
a *.txt file with the following data must be created:
DICTIONARY_PROPERTIES=USE_CONFIDENCE
201.01.063.030 100
201.01.063.031 100
201.01.063.040 100 - If you choose to create a new data type based on a regular expression, the wizard will prompt you to enter a regular expression. Use the
button to the right of the regular expression field to build your regular expression. For details, see Alphabet used in regular expressions. Click Next.
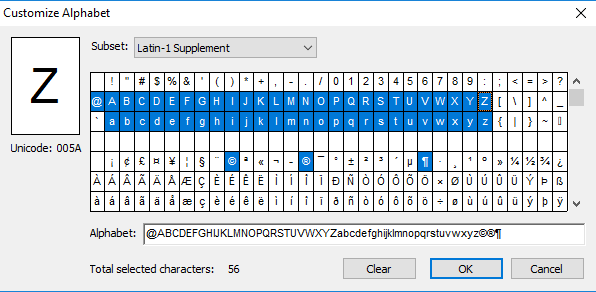
- If you choose to create a new data type based on an alphabet, or if you used characters in the regular expression that are not included in the alphabet of the language, the wizard will prompt you to specify an alphabet for your data type. You can either type the desired characters directly on the keyboard, or click Customize... and then use your mouse to select the desired characters.
To add punctuation marks and excluded (prohibited) characters, click Advanced Parameters.... You can either type the prohibited characters directly on the keyboard or click the button to the right and use your mouse to select the desired characters.
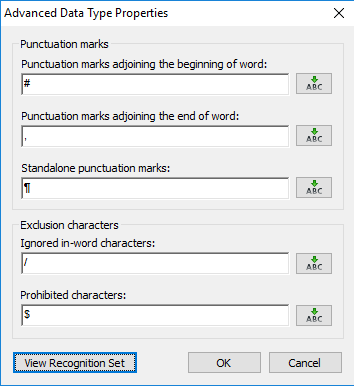
Click Next. - In the final window of the wizard, type in a name for your new data type and a short description. If you wish to edit the properties of the newly created data type, select the Edit properties option. Click Finish.
To create a new data type based on an existing data type:
- In the first window of the data type creation wizard, select Data type based on existing types. Select the desired language(s) and click Next.
- In the next window, select the source data type(s) based on which you are going to create your new data type. The data types that correspond to the selected languages are listed in the List1 in the left-hand side of the dialog box. The Text folder contains the natural languages selected in the first window. The Custom folder contains the data types created by users. The other folders contain the data types corresponding to the category and the special type of content.
To select a source data type, select it in the List1 field (hold down the Ctrl key to select more than one) and then click Add -> to transfer it to the right pane. Click Next.Note: If a new data type is based on several types, then the compliance of the whole field to at least one data type will be checked.
- In the final window of the wizard, type in a name for your new data type and a short description. If you wish to edit the properties of the newly created data type, select the Edit properties option. Click Finish.
The newly created data type will appear in the list of predefined data types when you select the content that was selected when creating the data type.
To specify the newly created data type for your field:
- On the Data tab of the field properties dialog box, select the desired item in the Data type list;
- Click the Edit... button to the right of the Details field;
- In the Content settings list, select Special;
- In the list that appears, select the data type you created (custom data types are marked with a special symbol) and click OK.
2/20/2021 12:32:38 PM