- Bulgarian (Български)
- Chinese Simplified (简体中文)
- Chinese Traditional (繁體中文)
- Czech (Čeština)
- Danish (Dansk)
- Dutch (Nederlands)
- Estonian (Eesti)
- French (Français)
- German (Deutsch)
- Greek (Ελληνικά)
- Hebrew (עִברִית)
- Hungarian (Magyar)
- Italian (Italiano)
- Japanese (日本語)
- Korean (한국어)
- Polish (Polski)
- Portuguese (Brazilian) (Português (Brasil))
- Slovak (Slovenský)
- Spanish (Español)
- Swedish (Svenska)
- Turkish (Türkçe)
- Ukrainian (Українська)
- Vietnamese (Tiếng Việt)
ABBYY Screenshot Reader
ABBYY Screenshot Reader is an easy-to-use application for creating screenshots and capturing text from the screen.
ABBYY Screenshot Reader features:
- Create screenshots
- Turn screenshots into editable text
- All the benefits of ABBYY OCR technology
ABBYY Screenshot Reader has a straightforward and intuitive interface, which means that you do not need any specialist knowledge to be able to make screenshots and recognize text in them. Simply open any window of any application and select the section of the computer screen which you wish to "photograph." You can then recognize the screenshot and save the image and the recognized text.
 ABBYY Screenshot Reader is available to registered users of certain ABBYY products. For details on how to register your copy of ABBYY FineReader 14, see Registering ABBYY FineReader.
- Installing and starting ABBYY Screenshot Reader
- Making screenshots and recognizing text
- Additional options
- Tips
Installing and starting ABBYY Screenshot Reader
By default, ABBYY Screenshot Reader is installed on your computer together with ABBYY FineReader 14.
To start ABBYY Screenshot Reader, click the ABBYY Screenshot Reader icon  on the taskbar.
There are several other ways to start ABBYY Screenshot Reader:
- Open the New Task window of ABBYY FineReader 14 and click Screenshot Reader on the Tools menu.
- Open the PDF Editor and click Screenshot Reader on the Tools menu.
- Open the OCR Editor and click Screenshot Reader on the Tools menu.
- In Microsoft Windows, click the Start button and then click ABBYY FineReader 14 > ABBYY Screenshot Reader on the Start menu. If you are using Windows 10, click the
 button and then clickAll Programs > ABBYY FineReader 14 > ABBYY Screenshot Reader on the Start menu.
Making screenshots and recognizing text
ABBYY Screenshot Reader can create screenshots of selected areas on the screen of your computer and save them to a file, copy them to the Clipboard, or send them to the OCR Editor.
When you launch ABBYY Screenshot Reader, the ABBYY Screenshot Reader window appears on the screen of your computer.
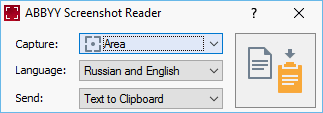
The ABBYY Screenshot Reader window contains tools for recognizing text and tables on the screen of your computer, for creating screenshots of selected screen areas, and for setting up the application.
To make a screenshot or to recognize a text fragment:
- Select a screen capture method from the Capture drop-down list.
- Area
Lets you select an area to capture. - Window
Captures a specific part of the screen (e.g. a window, a part of a window, or a toolbar). - Screen
Captures the entire screen. - Timed Screen
Captures the entire screen after a 5-second delay. - Select the language of the text you want to recognize from the Language drop-down list.
- In the Send drop-down list, select the application to which you want to send the image or recognized text.
The text and screenshots will be: - Copied to the clipboard (when you select Text to Clipboard, Table to Clipboard, or Image to Clipboard from the Send drop-down list).
- Placed in a new document (when you select Text to Microsoft Word [1] or Table to Microsoft Excel [2] from the Send drop-down list).
- Saved as a file (when you select Text to File, Table to File or Image to File from the Send drop-down list). The Save As dialog box will open and you will need to specify the name and format of the file.
- Opened in the OCR Editor of ABBYY FineReader 14 (when you select Image to OCR Editor [3] from the Send drop-down list). Select this item if the screen area contains both text and pictures.
- Attached to a newly created e-mail message as a *.bmp file (when you select Image to E-mail from the Send drop-down list).
 This item requires:
[1] Microsoft Word
[2] Microsoft Excel
[3] ABBYY FineReader 14 - Click the
 button.
Depending on the item you select in the Screenshot list, the screenshot will be created automatically or a capture tool will appear enabling you to select the desired area: - If you selected Area from the Capture drop-down list, an area of the screen will be selected.
- To adjust the borders of an area, place the mouse pointer on a border and drag it while holding down the left mouse button. To move an area, select the area and move it while holding down the left mouse button. When you have selected the desired area, click the Capture button.
- If you selected Window from the Capture drop-down list, place the mouse pointer over the desired area and when a color frame appears, press the left mouse button.
- If you selected Screen or Timed Screen from the Capture drop-down list, the screenshot will be created without any further input.
Notes.
- To cancel screen capture, press the Esc key or click the right mouse button.
- To cancel recognition, click the Stop button or press the Esc key.
To select additional options, right-click on the ABBYY Screenshot Reader icon on the taskbar and then click Options. The following options are available:
- Always on Top
Keeps the ABBYY Screenshot Reader toolbar on top of all the other windows when switching between applications. - Run at Startup
Launches ABBYY Screenshot Reader each time you start your computer. - Enable Sounds
Plays a sound notification when ABBYY Screenshot Reader copies a screen area to the Clipboard.
- Working with texts written in several languages
Select a text fragment written entirely in one language. Before starting the recognition process, make sure that the language you selected from the Language drop-down list is the same as the language of the text fragment. Select the correct language if it isn't. - If the required language is not in the list, select More languages... from the Language drop-down list and select the desired language in the dialog box that opens.
If you cannot find the required language in the list of available languages: - ABBYY Screenshot Reader does not support this language. For a full list of supported languages, please see http://www.abbyy.com. The list of supported languages may vary in different editions of the application.
- This language may have been disabled during custom installation. To install OCR languages:
- Open the Control Panel by clicking the Start > Control Panel.
- In the Control Panel window, click the Add or Remove Programs item. If you are using Windows 10, click the button and then click Settings > System > Apps & features.
- Select ABBYY FineReader 14 from the list of installed software and click the Change button.
- Select desired languages in the Custom Setup dialog box.
- Follow the on-screen instructions in the setup program.
- If the selected area contains both text and pictures:
In the Send drop-down list, click Image to OCR Editor. The screenshot will be added to an OCR project in the OCR Editor of FineReader 14, where you can process and recognize it. If the OCR Editor is already open, the image will be added to the current OCR project. Otherwise, a new OCR project will be created and the image will be added to this new project.
02.11.2018 16:19:18