- Bulgarian (Български)
- Chinese Simplified (简体中文)
- Chinese Traditional (繁體中文)
- Czech (Čeština)
- Danish (Dansk)
- Dutch (Nederlands)
- Estonian (Eesti)
- French (Français)
- German (Deutsch)
- Greek (Ελληνικά)
- Hebrew (עִברִית)
- Hungarian (Magyar)
- Italian (Italiano)
- Japanese (日本語)
- Korean (한국어)
- Polish (Polski)
- Portuguese (Brazilian) (Português (Brasil))
- Slovak (Slovenský)
- Spanish (Español)
- Swedish (Svenska)
- Turkish (Türkçe)
- Ukrainian (Українська)
- Vietnamese (Tiếng Việt)
Automating document processing with ABBYY FineReader
(Not available in some versions of ABBYY FineReader 14. See also: http://www.ABBYY.com/FineReader)
In ABBYY FineReader, you can use built-in and custom automated tasks to process your documents. You can organize your tasks in the Automated Tasks... dialog box.
- To open the Automated Tasks dialog box, click Tools > Automated Tasks.
The toolbar at the top of the Automated Tasks dialog box contains buttons for creating, modifying, copying, deleting, importing, and exporting tasks.
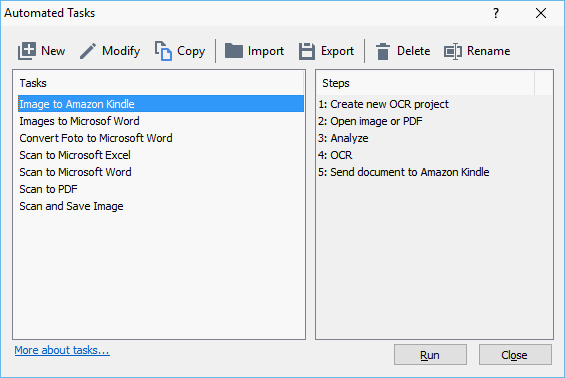
To process a document using an automated task, start the task in Tasks window.
Creating Custom Automated Tasks
You can create your own automated tasks if you need to include processing steps that are not available in the built-in automated tasks. The order of steps in an automated task must correspond to the order of processing operations in the OCR Editor.
- On the toolbar, click New.
- In the left-hand pane, choose an OCR project to be used:
- Create new OCR project
If you choose this option, a new OCR project will be created when you start the task. You will also need to specify which document options to use when processing your documents: the global options specified in the program or the options specified in this particular task. - Select existing OCR project
Select this option if you want the task to process images from an existing OCR project. - Use current OCR project
Select this option if you want the task to process images from the current OCR project. - Choose how you will obtain images:
- Open image or PDF
Select this option if you want the task to process images or PDF documents from a particular folder (you will need to specify the folder in this case). - Scan
Select this option if you are going to scan some pages (the current scanning settings will be used).
Note: - This step is optional if earlier you chose the Select existing OCR project or Use current OCR project command.
- If images are added to an OCR project that already contains images, only the newly added images will be processed.
- If an OCR project to be processed contains some pages that have already been recognized and some pages that have already been analyzed, the recognized pages will not be processed again and the analyzed pages will be recognized.
- Add the Analyze step to detect areas on the images and configure this step:
- Analyze the layout automatically
ABBYY FineReader will analyze the images and identify the areas based on their content. - Draw areas manually
ABBYY FineReader will ask you to draw the appropriate areas manually. - Use an area template
Select this option if you want an existing area template, to be used when the program analyzes the document. You will need to either specify a template or choose to have the program prompt you to select one every time the task starts. For details, see If you are processing a large number of documents with identical layouts. - Add an OCR step if you need the images to be recognized. The program will use the OCR options you selected in the OCR project step.
 When you add an OCR, step the Analyze step is added automatically.
 - Add an OCR step to save the recognized text in a format of your choice, e-mail the text or images, or create a copy of the OCR project. A task may include multiple saving steps:
- Save document
Here you can specify the name of the file, its format, file options and the folder where the file should be saved. To avoid specifying a new folder each time the task is started, select Create a time-stamped subfolder. - Send document
Here you can select the application in which to open the resulting document. - E-mail document
Here you can specify the name of the file, its format, file options, and the e-mail address to which the file should be sent. - Save images
Here you can specify the name of the file, its format, file options, and the folder where the image file should be saved. To save all images to one file, select Save as one multi-page image file (applicable only to images in TIFF, PDF, JB2, JBIG2, and DCX). - E-mail images
Here you can specify the name of the file, its format, file options, and the e-mail address to which the image file should be sent. - Save OCR project
Here you can specify the folder to which the OCR project should be saved.
Specify which options the program should use to save the results. You can choose between the global options specified in the program at the time of saving or the options which you specified for this particular task. - Remove any unnecessary steps from the task by clicking the
 button. Sometimes, removing one step will also cause another step to be removed. For instance, if you remove the Analyze step, the OCR step will also be removed, as OCR cannot be carried out without analyzing an image.
 - Once you have configured all the required steps, click Finish.
The newly created task will appear in the Tasks window.
To save an automated task, click Export on the toolbar at the top of the Automated Tasks dialog box and specify a name and folder for the task.
To load a previously created automated task, click Import on the toolbar at the top of the Automated Tasks and select the file of the task that you want to import.
11/2/2018 4:19:18 PM