- Bulgarian (Български)
- Chinese Simplified (简体中文)
- Chinese Traditional (繁體中文)
- Czech (Čeština)
- Danish (Dansk)
- Dutch (Nederlands)
- Estonian (Eesti)
- French (Français)
- German (Deutsch)
- Greek (Ελληνικά)
- Hebrew (עִברִית)
- Hungarian (Magyar)
- Italian (Italiano)
- Japanese (日本語)
- Korean (한국어)
- Polish (Polski)
- Portuguese (Brazilian) (Português (Brasil))
- Slovak (Slovenský)
- Spanish (Español)
- Swedish (Svenska)
- Turkish (Türkçe)
- Ukrainian (Українська)
- Vietnamese (Tiếng Việt)
OCR Editor interface
The OCR Editor window displays your current OCR project. For more information on working with OCR projects, see OCR projects.
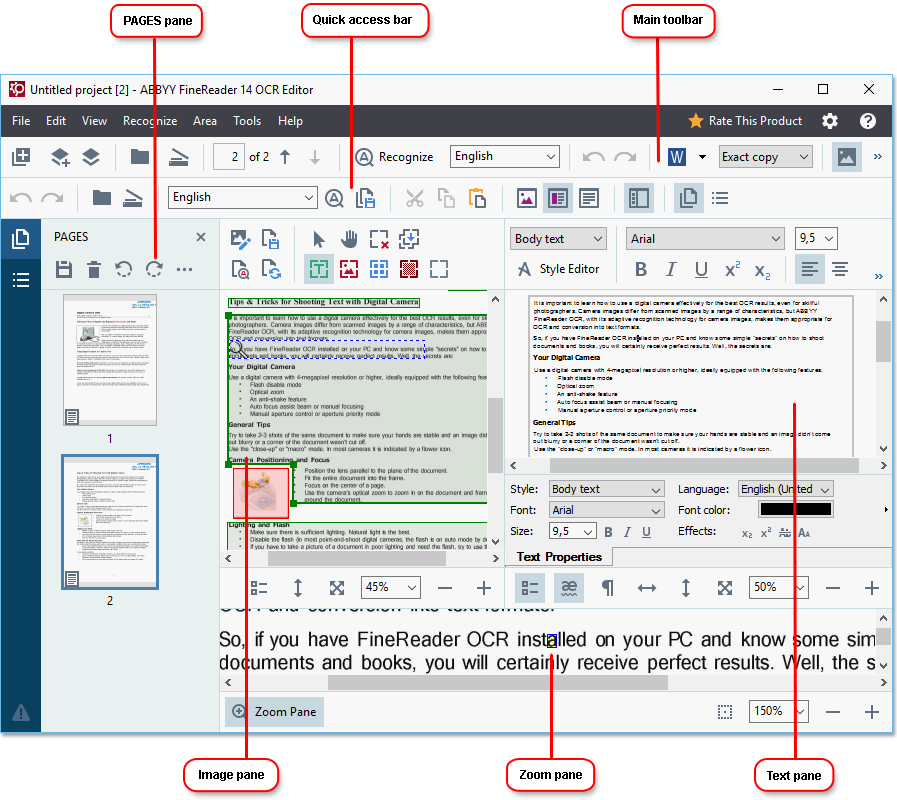
- The Pages pane shows the pages contained in the OCR project. Two page views modes are available: thumbnails (shown above) and details, which shows a list of document pages and their properties. To switch between the views, right-click anywhere in the Pages pane and select Navigation Pane > Thumbnails or Navigation Pane > Details. Alternatively, use the View menu at the top of the OCR Editor window.
- The Image pane displays the image of the current page. Here you can edit recognition areas and change area properties.
- The Text pane displays the recognized text. Here you can check the spelling and edit the recognized text.
- The Zoom pane displays an enlarged image of the current line of text or any other image area you are currently working on. In the Image pane you see the entire page, whereas in the Zoom pane you can examine certain image fragments in greater detail, e.g. compare the image of a character with its recognized counterpart in the Text window. To scale the image up or down, use the
 controls at the bottom of the pane.
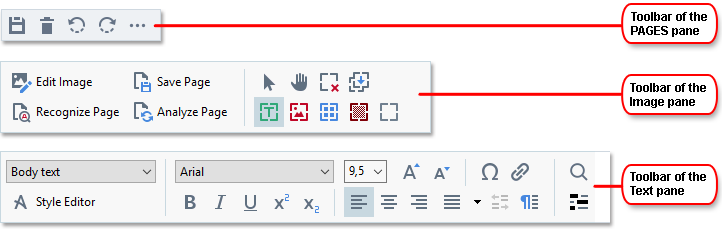
Toolbars
There are several toolbars in the OCR Editor. The toolbar buttons provide easy access to program commands. The same commands can also be invoked by pressing their corresponding keyboard shortcuts.
The Main Toolbar features a set of buttons for the most commonly used operations. Using these buttons, you can open a document, scan a page, open an image, recognize pages, and save the results. The main toolbar cannot be customized.

The Quick Access Bar is fully customizable and contains the buttons that you use the most. This toolbar is hidden by default. To make it visible, click View > Toolbars and select Quick Access Bar. Alternatively, right-click anywhere on the main toolbar and select Quick Access Bar.

To customize the Quick Access Bar:
- Click View > Customize... to open the Customize Toolbars and Shortcuts dialog box.
- On the Toolbars tab, select a category from the Categories drop-down list.
 The set of commands available in the Commands list will change accordingly. The commands are grouped in the same manner as in the main menu.
 - From the Commands list, select a command and click >> to add it onto the Quick Access Bar or click << to remove it.
- Click OK to save the changes.
- If you want to reset the Quick Access Bar to its default state, click the Reset All button.
The toolbars in the Pages, Image, and Text panes contain buttons for commands applicable to objects that can be displayed in the respective pane:
The Warnings pane displays warnings and error messages.

To show the Warnings pane, click View >
Show Warnings
or click the  button in the lower left-hand corner of the OCR Editor window.
Warnings and errors are displayed for the page that is currently selected in the Pages pane. To scroll through the warnings and errors and delete unwanted messages, use the  buttons.
Customizing the OCR Editor workspace
- You can temporarily hide the panes that you do not need. To show/hide panes, use the View menu or the following keyboard shortcuts:
- F5 — shows or hides the Pages pane.
- F6 — shows or hides the Image pane.
- F7 — shows or hides the Image and Text panes.
- F8 — shows or hides the Text pane.
- Ctrl+F5 — shows or hides the Zoom pane.
- To change the size of a pane, hover the mouse cursor on one of its borders until a double-headed arrow appears and drag the border in the desired direction.
- To change the position of the Pages or Zoom pane, use the View menu or the shortcut menu of the pane.
- To show or hide the Warnings pane, click View and select or clear the Show Warnings item.
- To show or hide the Properties bar at the bottom of the Image or Text pane, select or clear the Properties item in the context menu of the pane or click the
 button.
 - Some of the pane properties can be customized on the Areas and Text tab of the Options dialog box.
All of the pages of your current OCR project are displayed in the Pages pane. Two page views are available.
To change the way the pages are displayed in the Pages pane:
- Use the
 and
and  buttons in the Pages pane.
 - Click View > Navigation Pane.
- Right-click anywhere in the Pages pane, click Navigation Pane in the context menu, and then select the desired item.
To open a page, double-click its thumbnail in the Pages pane (in Thumbnails view) or double-click its number (in Details view). The image of the selected page will be shown in the Image pane. If OCR has already been performed on this page, the recognized text will appear in the Text pane.
11/2/2018 4:19:18 PM