- Bulgarian (Български)
- Chinese Simplified (简体中文)
- Chinese Traditional (繁體中文)
- Czech (Čeština)
- Danish (Dansk)
- Dutch (Nederlands)
- Estonian (Eesti)
- French (Français)
- German (Deutsch)
- Greek (Ελληνικά)
- Hungarian (Magyar)
- Italian (Italiano)
- Japanese (日本語)
- Korean (한국어)
- Polish (Polski)
- Portuguese (Brazilian) (Português (Brasil))
- Slovak (Slovenský)
- Spanish (Español)
- Swedish (Svenska)
- Turkish (Türkçe)
- Ukrainian (Українська)
- Vietnamese (Tiếng Việt)
Image Preprocessing
Distorted text lines, skew, noise, and other defects commonly found in scanned images and digital photos can lower recognition quality. ABBYY FineReader can remove these defects automatically, and also lets you remove them manually.
Automatic image preprocessing
ABBYY FineReader has several image preprocessing features. If these features are enabled, the program automatically determines how an image can be improved based on its type and applies any necessary enhancements: removes noise, corrects skew, straightens text lines, and corrects trapezoidal distortions.
Note: These operations may take a significant amount of time.
Complete the steps below if you want ABBYY FineReader 12 to automatically preprocess all images that are opened or scanned.
- Open the Options dialog box (Tools >Options…).
- Click the Scan/Open tab and make sure that the Automatically process pages as they are added option in the General group is enabled and the necessary operations are selected in the Image preprocessing group.
Note: Automatic image preprocessing can also be enabled and disabled in the Open Image dialog box (File >Open PDF File or Image…) and in the scanning dialog box.
Editing images manually
You can disable automatic preprocessing and edit images manually in the Image Editor.
Follow the instructions below to edit an image manually:
- Open the Image Editor by clicking Edit Image… on the Page menu.
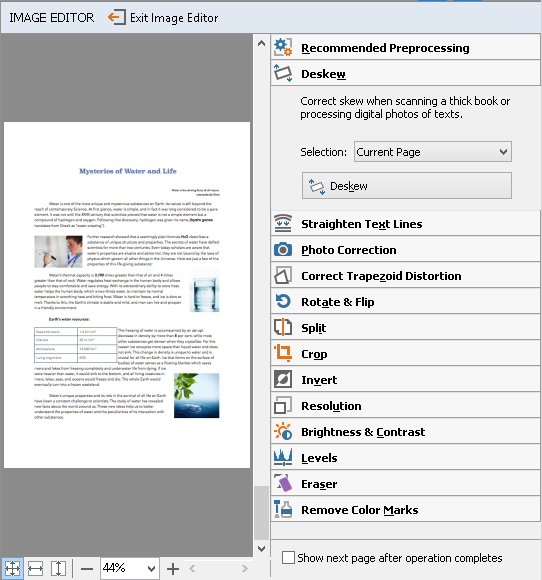
The left-hand part of the IMAGE EDITOR contains the page of the FineReader document that was selected when you opened the Image Editor. The right-hand part contains multiple tabs with tools for editing images.
- Select a tool and make the desired changes. Most of the tools can be applied to selected pages or to all pages in the document. You can select pages using the Selection drop-down list or in the Pages window.
- Click the Exit Image Editor button after you are done editing the image.
The image editor contains the following tools:
- Recommended Preprocessing The program automatically determines which adjustments need to be made to the image. Adjustments that may be applied include noise and blur removal, color inversion to make the background color light, skew correction, straightening of text lines, correction of trapezoidal distortion, and trimming of image borders.
- Deskew Corrects image skew.
- Straighten Text Lines Straightens any curved text lines on the image.
- Photo Correction Tools in this group let you straighten text lines, remove noise and blur, and turn the document's background color into white.
- Correct Trapezoid Distortion Corrects trapezoidal distortions and removes image edges that don't contain any useful data. When this tool is selected, a blue grid appears on the image. Drag the grid's corners to the corners of the image. If you do this correctly, the grid's horizontal lines will be parallel to the text lines. Now click the Correct button.
- Rotate & Flip Tools in this group let you rotate images and flip them vertically or horizontally to get the text on the image facing in the right direction.
- Split Tools in this group let you split the image into parts. This can be helpful if you are scanning a book and need to split facing pages.
- Crop Removes image edges that don't contain any useful information.
- Invert Inverts image colors. This can be useful if you're dealing with non-standard text coloring (light text on a dark background).
- Resolution Changes image resolution.
- Brightness & Contrast Changes the brightness and contrast of the image.
- Levels This tool lets you adjust the color levels of the images by changing the intensity of shadows, light, and halftones.
To raise the contrast of an image, move the left and right sliders on the Input levels histogram. The left slider sets the color that will be considered to be the blackest part of the image, and the right slider sets the color that will be considered to be the whitest part of the image. Moving the middle slider to the right will darken the image, and moving it to the left will lighten the image.
Adjust the output level slider to decrease the contrast of the image.
- Eraser Removes a part of the image.
- Remove Color Marks Removes any color stamps and marks made in pen to facilitate the recognition of the text obscured by such marks. This tool is designed for scanned documents with dark text on a white background. Do not use this tool for digital photos and documents with color backgrounds.
14.01.2020 17:26:19