Workflow Guideline
The guidelines below will help you to get acquainted with the working process. For additional information about the steps, follow the links in the descriptions.
Important. Role required: Recording Service user.
If your account is not added to the Admin AD Security group specified during the Recording Service installation, you will not have access to the Recording Service website.
- Make sure the Timeline Authentication settings are specified.
To do this, go to Settings > Timeline Authentication and check if the fields are filled and the Save button is disabled.
Note. Authentication settings are set by the system administrator after the Recording Service installation. These settings are available only to admins of the Recording Service. Most likely, you do not have access to edit these settings. - Go to Settings > Logs and review the default settings for additional options related to personifying recorded logs and blurring sensitive information in text logs and screenshots.
Important. These settings are available only to admins of the Recording Service.
For details, see Settings > Logs. - Make sure all installed Recorders appear in the Recorders section, and their status is online.
If a Recorder instance does not appear in the list, contact your administrator to resolve this issue. - Go to Templates and review the parameters in the default template.
Use Templates to specify what data needs to be logged and how it has to be processed. Here you can schedule recording sessions of user activity, enable advanced logging if you plan to export processes from Timeline for further import and refinement in Blue Prism applications, or allow Recording Service to log user activities in one log, in case a user works on multiple computers.
For details, see Configuring and Applying Templates. - Setup Included and Excluded lists
It is a very powerful feature that allows defining fine-grain control over what applications should be monitored and logged and which ones should be excluded completely. To utilize this filtering mechanism to eliminate unwanted events from your logs, you can set up lists of included and excluded applications for logging.
Using Included and Excluded lists can significantly reduce the amount of unwanted data in the project and make analyzing tasks and processes easier. This becomes very important when dealing with large datasets that include important events which may be surrounded by third-party actions. As a result, the important ones are made harder to isolate and analyze by multiple case and path deviations complicated by unnecessary data.
Before recording logs, application lists can be configured using the template on the Recording Service website > Template tab. - Add transformations
It happens that sensitive data can be captured by Recorder as event names, for example, email addresses or IDs. This data can be viewed in the Definition Editor after uploading the logs to ABBYY Timeline. To hide such data from users, you can use transformations. This feature allows finding and replacing text in logs in order to redact sensitive information. By default, there are no transformations specified. To add one to the template, do it in the Transformations tab before recording logs.
Transformations complement the Obfuscate user data feature, which is enabled by default. For example, transformations allow you to replace an URL or some text in logs that should remain confidential, while obfuscation allows you only to mask text data or blur information in pictures. - Go to Recorders, select a Recorder instance, and click Start.
All user actions will be recorded in logs and sent to the Recording Service to process.
If necessary, you can stop the recording at any time by clicking Stop. - Connect to your account in Timeline.
Click Connect on the left bar and then click Connect in the opened Connect to your Timeline account dialog.
As a result, the Timeline login form will open. Enter your Timeline credentials and click Allow in the access permission window.
This will enable Recording Service to upload logs into your account projects.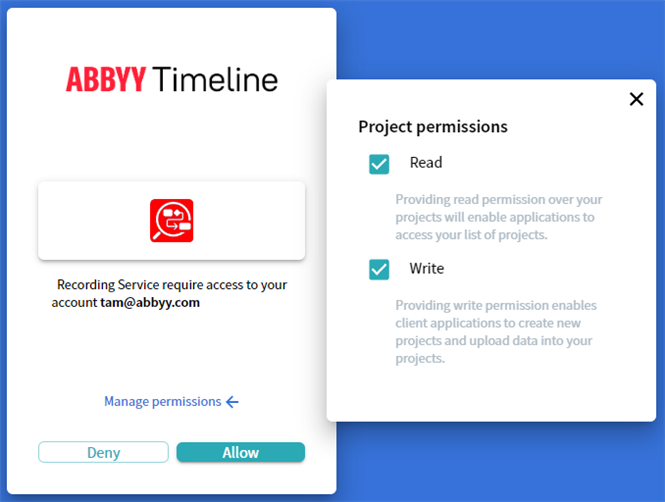
- Upload logs to Timeline from Recording Service. To do this:
- Go to Logs.
All recorded events are collected into logs and available in the Logs tab.
Note. The logs may take some time to process. We recommend waiting for a while after recording before starting to work with the logs. - Select logs and click Load to project in the top right corner.
- In the opened Project list windows enter the name for your new Task Mining project and click Create to upload logs.
- All selected logs will be queued for upload.
Information about the upload process is displayed in the message box. You can abort the upload by clicking Cancel in the message box.
Note. It is impossible to cancel the upload of logs that have already been submitted to Timeline by the moment of cancellation. Such logs will be available for work on the Timeline website. - Click
 to see the log import status. After the program finishes the import, click the project name link to navigate to the Task view page with project overview information.
Note. The Task view page opens on the Timeline website. - Define tasks.
The collected data is uploaded into a Task Mining project on the Timeline website, where tasks should be defined.
For detailed instructions on task definition, forms review, log cutting, task schema, and all the details of working with a Task Mining project, see Timeline user's guide > 'Task Mining' section. - Analyze data.
Using the collected data, ABBYY Timeline will automatically discover which tasks will benefit most from process automation. Task Mining will help you examine the complexity of the tasks, the order of actions employed by each user to complete the same task, the time spent on each task, routines performed by all users, etc.
05.09.2024 16:23:54