- English (English)
- Bulgarian (Български)
- Chinese Simplified (简体中文)
- Chinese Traditional (繁體中文)
- Czech (Čeština)
- Dutch (Nederlands)
- French (Français)
- German (Deutsch)
- Greek (Ελληνικά)
- Hungarian (Magyar)
- Italian (Italiano)
- Japanese (日本語)
- Korean (한국어)
- Polish (Polski)
- Portuguese (Brazilian) (Português (Brasil))
- Slovak (Slovenský)
- Spanish (Español)
- Swedish (Svenska)
- Turkish (Türkçe)
- Ukrainian (Українська)
- Vietnamese (Tiếng Việt)
Creating forms
To create a form:
- In the PDF Editor, create a new document or open an existing one.
Se også: Viewing PDF documents - Switch to form editing mode.
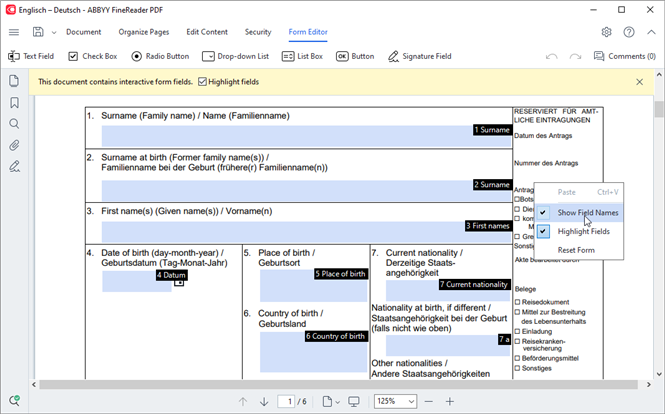
To do so, navigate to the Formulareditor tab. The toolbar on this tab will display the various field types that can be added to the PDF document. If your form already contains interactive fields, their names will be displayed on the form. If you do not want to see the field names, right-click anywhere on the form and clear the check box next to the Vis feltnavne item on the shortcut menu. Alternatively, click Formulareditor > Vis feltnavne.
 In form editing mode, the main PDF tools become unavailable.
 - Add and edit form fields as required and adjust their position on the page.
 Fields can only be repositioned within the current page.
 To see your form fields as they will be displayed to the user, exit form editing mode.
You can add fields of the following types: - Save your form.
 Saving you form as a PDF document (Fil > Gem som > PDF-dokument...) will preserve the interactive fields so that you or other users will be able to fill out the form when they open the PDF file. Saving your form in other formats (e.g. Microsoft Word) will render it non-editable.
 To fill out your PDF form, exit form editing mode.
12.06.2024 14:29:24