- Bulgarian (Български)
- Chinese Simplified (简体中文)
- Chinese Traditional (繁體中文)
- Czech (Čeština)
- Danish (Dansk)
- Dutch (Nederlands)
- Estonian (Eesti)
- French (Français)
- German (Deutsch)
- Greek (Ελληνικά)
- Hungarian (Magyar)
- Italian (Italiano)
- Japanese (日本語)
- Korean (한국어)
- Polish (Polski)
- Portuguese (Brazilian) (Português (Brasil))
- Slovak (Slovenský)
- Spanish (Español)
- Swedish (Svenska)
- Turkish (Türkçe)
- Ukrainian (Українська)
- Vietnamese (Tiếng Việt)
Making Screenshots and Recognizing Texts
ABBYY Screenshot Reader can create screenshots of selected areas on the screen of your computer and save them to a file, copy them to the Clipboard or send them to ABBYY FineReader.
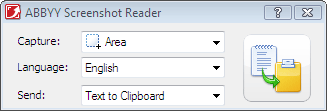
When you launch ABBYY Screenshot Reader, the ABBYY Screenshot Reader window appears on the screen of your computer.

The ABBYY Screenshot Reader window contains tools for recognizing text and tables on the screen of your computer, for creating screenshots of selected screen areas, and for setting up the application.
To make a screenshot or to recognize a text fragment:
- From the Screenshot list in the ABBYY Screenshot Reader select a screen capture method:
- Area
- Window
- Screen
- Timed Screen
- In the Language list, select a recognition language
- In the Send list, select the destination application into which the recognized screenshot or text should be sent
- Click

- If the Area option is selected, an area will be selected on the screen.
- If you select Window, the cursor will change to
 .
. - If you select Screen or Timed Screen, the screenshot will be created automatically.
- To cancel screen capture, press Esc or the right mouse button.
- To cancel the recognition, click Stop or press Esc.
captures an area of your choice.
captures a part of the screen (e.g. a window, a window fragment, a toolbar, etc.).
captures the entire screen.
captures the entire screen with a delay of 5 seconds.
The selected text or screenshot may be sent to:
- the Clipboard (Text to Clipboard, Table to Clipboard or Image to Clipboard)
- a new document (Text to Microsoft Word[1] or Table to Microsoft Excel[2])
- a file (Text to File, Table to File or Image to File). In the Save As dialog box, provide a file name and select a format
- ABBYY FineReader 11 (Image to ABBYY FineReader[3]). Select this item if the screen area contains both text and pictures
- a *.bmp file and attached to a new created e-mail message (Image to E-mail).
Important!
This item requires:
[1] Microsoft Word
[2] Microsoft Excel
[3] ABBYY FineReader 11
to be installed on your machine.
Depending on the item you select in the Screenshot list, the screenshot will be created automatically or a capture tool will appear enabling you to select the desired area:
If required, adjust the position and borders of the area and click Capture.
To adjust the borders of an area, place the mouse pointer on a border and drag it while holding down the left mouse button. To move an area, select the area and move it while holding down the left mouse button.
Point the mouse cursor to the desired area and well a color frame appears, press the left mouse button.
Note:
8/27/2018 7:01:48 AM