Using Postman
To get a new token using the Postman interface, follow the steps below:
- Create a new empty request.
- Go to the Authorization tab.
- In the Type drop-down, select OAuth 2.0.
- Fill in the mandatory fields of the dialog with your information from your registered OAuth client and OAuth 2.0-related metadata from Timeline.
You can find the metadata in the account section by clicking your user avatar at the bottom of the left bar and then selecting Account. Then open OAuth & OpenID Connect tab and click on OAuth 2.0 metadata. - Callback URL - the Redirect URI value from the respective OAuth client.
Important. For a successful token request in Postman, you need to add the following value to your OAuth connection in Timeline:
https://oauth.pstmn.io/v1/callback - Auth URL - authorization endpoint from metadata.
https://{your_timeline_instance}.com/api/auth/oauth/authorize
- Access Token URL - token endpoint from metadata.
https://{your_timeline_instance}.com/api/auth/oauth/token
- Client ID - the client ID value from the respective OAuth client.
- Client Secret - the client secret value from the respective OAuth client.
Example of a filled form:
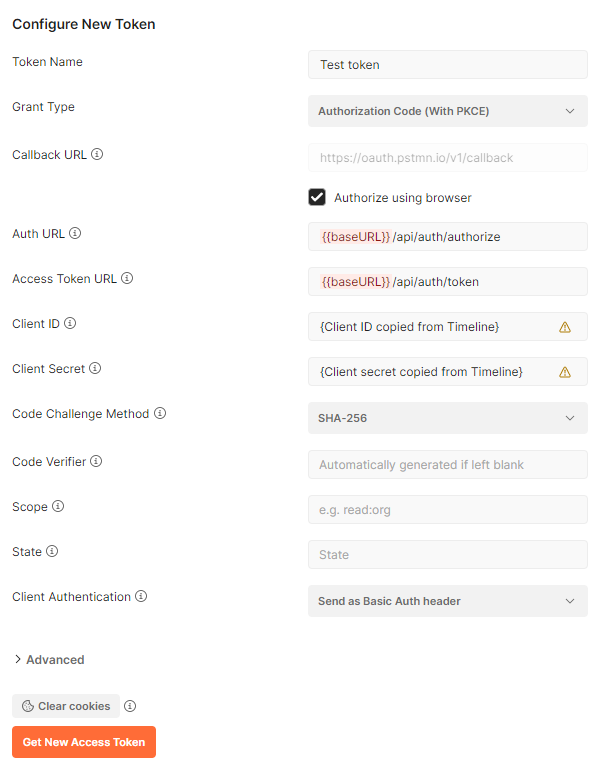
- Click Get new access token.
- In your browser, a dialog will appear, where an OAuth client registered in your Timeline account is asking for your consent to provide access to your Timeline account.
Make sure you are giving consent to the correct client.
Note. If there is no active Timeline session in the browser, you will be asked to log into your Timeline account first. - Additionally, you can check and edit the scopes that will be granted after you finish the authentication process. To do it, click Manage the permissions. It will expand the permissions list where you can see the active scopes. If needed, you can unmark the checkboxes for the excessive scopes which you do not plan to use.
For details on existing scopes, see Scopes. - When everything is reviewed, click Allow to provide your consent and proceed with authentication.
Note. Clicking Deny will abort the authentication process. - In Postman UI, a window will appear with the freshly received access token. Use it to proceed with Transmitting Access Token.
Configuring Postman environment (optional)
If you are planning to execute multiple tests using Postman in the future, consider creating a separate environment related to the OAuth client registered in Timeline. This way you could parametrize some elements which are essential for sending requests.
Show a configuration example of Postman environment
05.09.2024 16:23:54