Upgrading from Previous Versions
If you own an older Timeline version, you can upgrade to ABBYY Timeline 6.1 Depending on the Red Hat Enterprise Linux version you use, there are the following preconditions:
- RHEL7
Upgrade from Timeline 5.2 is only possible within Red Hat Enterprise Linux 7 versions. - RHEL8
Under Red Hat Enterprise Linux 8 the minimal version for upgrade is Timeline 5.3, since previous versions do not support this operating system. - Clean installation on a separate server
If upgrade is not possible, or you need to do a clean installation on a new server, you can still connect a remote database used in the previous Timeline version by connecting to it in the Connect to Database step.
This means that you can install a new version of ABBYY Timeline and your databases and previous settings will be maintained.
Before you begin
If you are using a local database, before starting the upgrade procedure we recommend taking additional precautions to keep it intact and assure its functioning after the upgrade:
- Backup local files
A simple manual backup will be sufficient. To do it, you need to copy the whole installation folder (/opt/timeline) to a separate location.
You can delete the copied folder after you make sure that the upgrade was successful. - Backup remote database
If you are using a remote database, it is recommended to make a backup of it. Please see the official PostgreSQL documentation for instructions on how to do it - https://www.postgresql.org/docs/12/backup.html - Keep the installer of a previous version
We also recommend keeping the installer of the currently running version since it will be needed for restore, in case something went wrong during the upgrade. If you deleted it, you can request the installer for the previous version from the ABBYY Technical Support service on this page. - Prepare enough storage space
Make sure the size of the free space on the target server is at least 3 times greater than your database size. The upgrade includes switching to PostgreSQL 13, that involves the local database migration.
Although issues during the upgrade are unlikely, these actions will help you to additionally protect your data. If you nonetheless faced an upgrade issue, you will be able to restore the stable version. For instructions see the Restore section below.
Procedure
To update your Timeline installation to the latest version, you have to execute the following steps:
- Backup your data as described in Before you Begin section, if needed.
- Run the Timeline installation as described in the Installing ABBYY Timeline section and follow the instructions of the Installation Wizard. Press Y when the program will prompt you to upgrade.
- When prompted Import existing Timeline installation select /opt/timeline or custom path depending on where the program is already installed.
- Select PostgreSQL location when prompted Do you want ABBYY Timeline to use a local PostgreSQL instance or connect to a remote database?
- When upgrading from any supported version, database settings from any location are maintained.
- If you are doing a clean installation of a new version but want to use a remote database that was installed and configured with one of the previous Timeline versions, specify the parameters for connecting to this remote database at the Connect to Database step. For this scenario, only the databases created in PostgreSQL 12 are supported.
Note. If you choose the local instance option - a new database will be created.
- If you plan to configure HTTPS with SSL specify HTTPS port when prompted.
- To use existing databases, specify the values for connecting to them in the Connect to Database step. Depending on the database used, some additional actions or precautions should be made:
- Local database
If your local database was migrated due to the PostgreSQL update, you will be notified by the installer. The notification prompts to check the data integrity after the installation. The installer does not remove your old database automatically, so you need to delete it manually after you make sure it is migrated correctly.
Important. We strongly recommend to backup the installation folder (by default /opt/timeline) before starting the upgrade. This way your local database is backed up as well, making it easier for you to roll back to the previous Timeline version using the old database if you face any issues after the upgrade. For details, see Restore previous version. - Remote database
We recommend paying extra attention to the values entered. Incorrect user credentials (e.g. a typo in username) will cause a new database creation. - Complete the Timeline installation.
- Perform Timeline health check.
- If you have a local database migrated, check its integrity. If the migration was successful, manually delete the old database from the installation directory (by default /opt/timeline).
- After the installation process is complete, you need to rebuild all old Task Mining projects so that they are available to work in the new Timeline version. For detailed instructions on rebuilding of the existing Task Mining project, see below.
How to Rebuild an existing Task Mining project
- Open a browser and enter {timelineURL}:{port} in the address bar, where:
{TimelineUrl} is the Base URL you specified during the Timeline installation or the public IP address or the full name of the computer on which Timeline is installed.
{port} is a custom port assigned to the Timeline website during the installation process. If you are using the default port (80 or 443), you do not need to add them to the {timelineURL}. By default, TCP/IP port 80 or 443 is used.
Example: http://mytimeline:8080 or https://mytimeline:30443 - Login using the Timeline admin credentials you specified in the 'Admin User Account' step during the Timeline installation process.
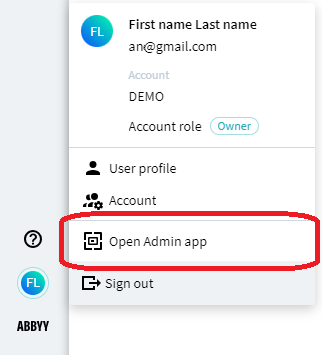
- Click your user avatar at the bottom of the left bar, then select Open Admin app.

- In the Admin app, go to the Project tab and click Rerun all task mining cutting.
Important. Please do not refresh or close this browser page until the process is finished.
9/5/2024 4:23:54 PM